Supplier Registration
The Supplier Registration process is used by suppliers (and internal users on their behalf) to submit their registration request to become a supplier of the buying organization. This guide provides detailed instructions on how to successfully complete the Supplier Registration process in Oracle. Regardless of how a supplier is introduced, the buying organization reviews the registration request using a collaborative review process and determines if it wants to consider this company as a new source of supply. From registering a new supplier to managing registration requests, follow the engaging steps below to streamline the collaborative process of Supplier registration.
To start the supplier registration process, navigate to the “Suppliers” section by clicking on the Navigator icon, expand the Procurement Menu, and then select the Suppliers submenu.
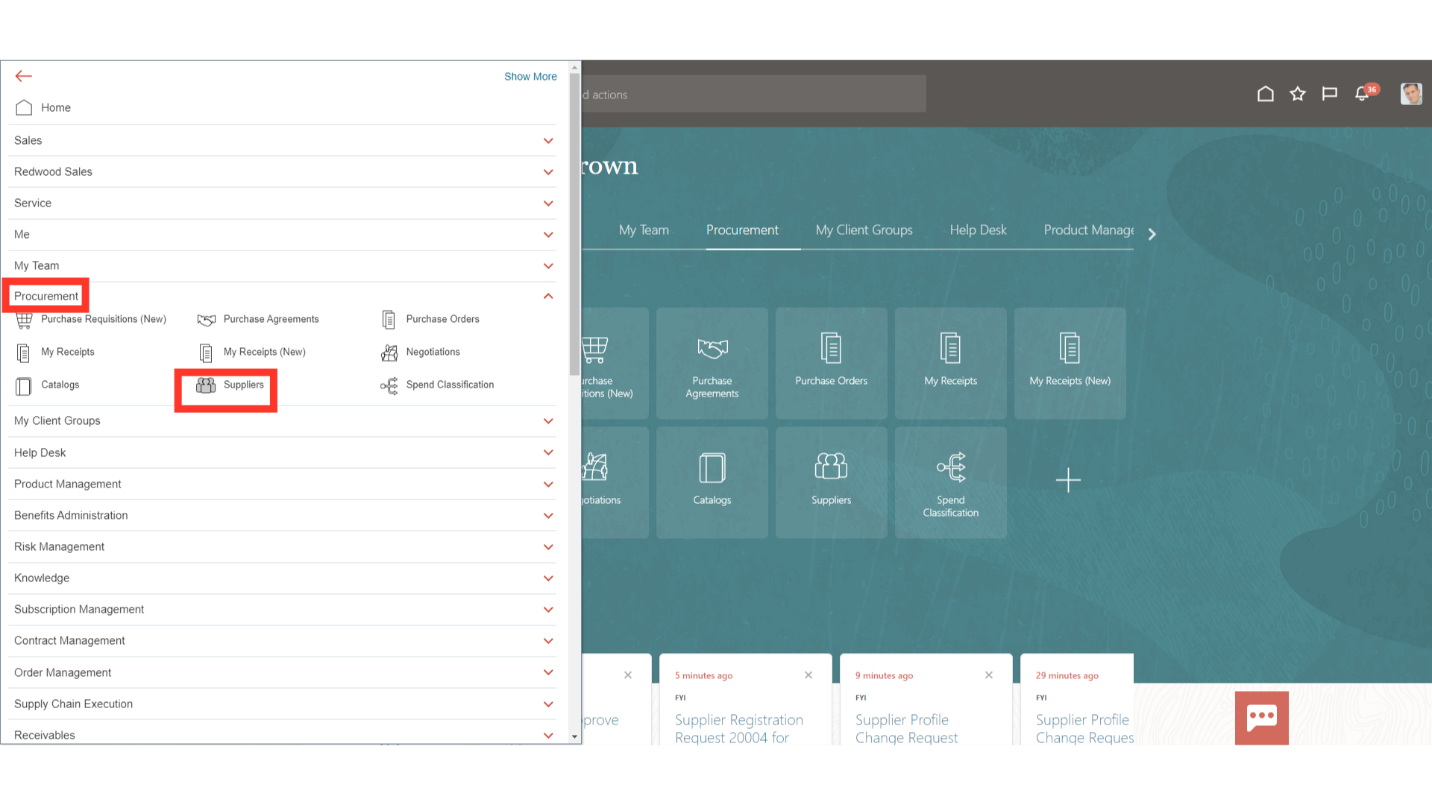
On the supplier’s dashboard, click on the Task icon and select the “Register Supplier” from the list.

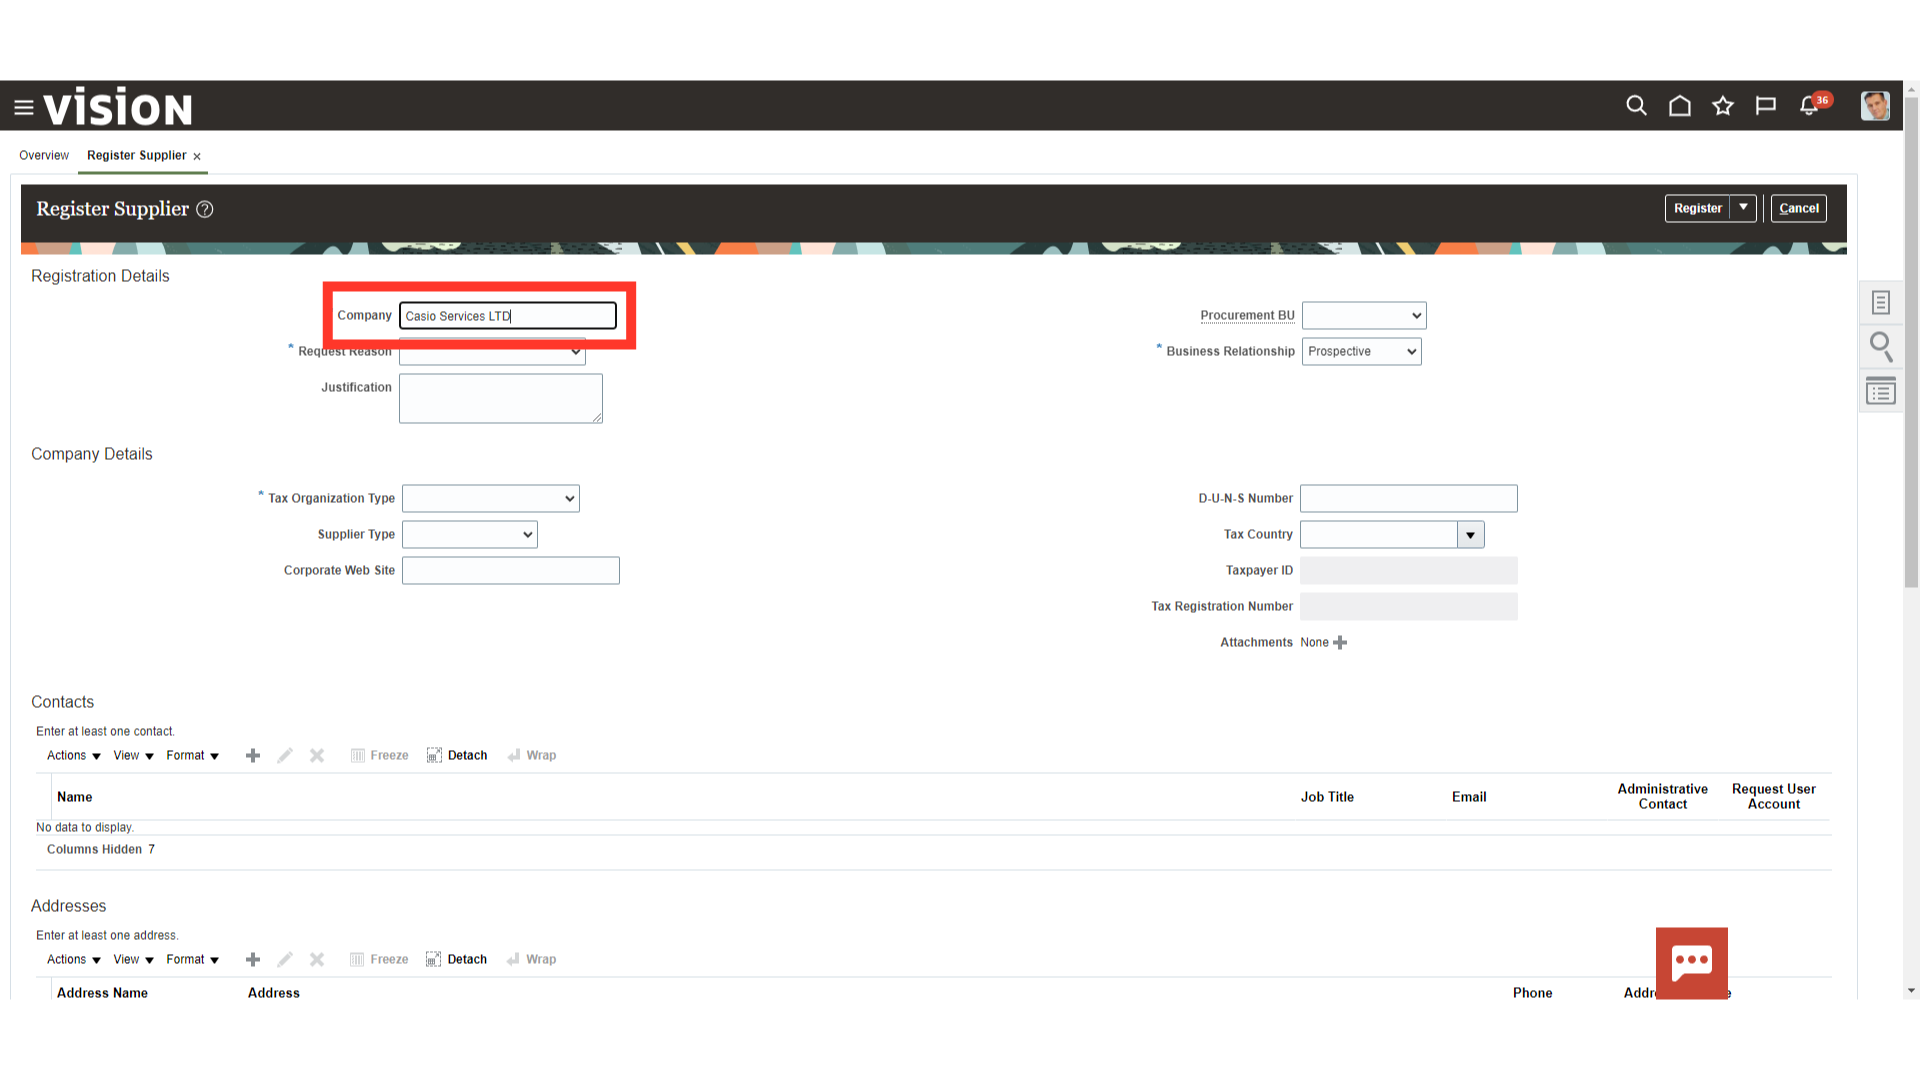
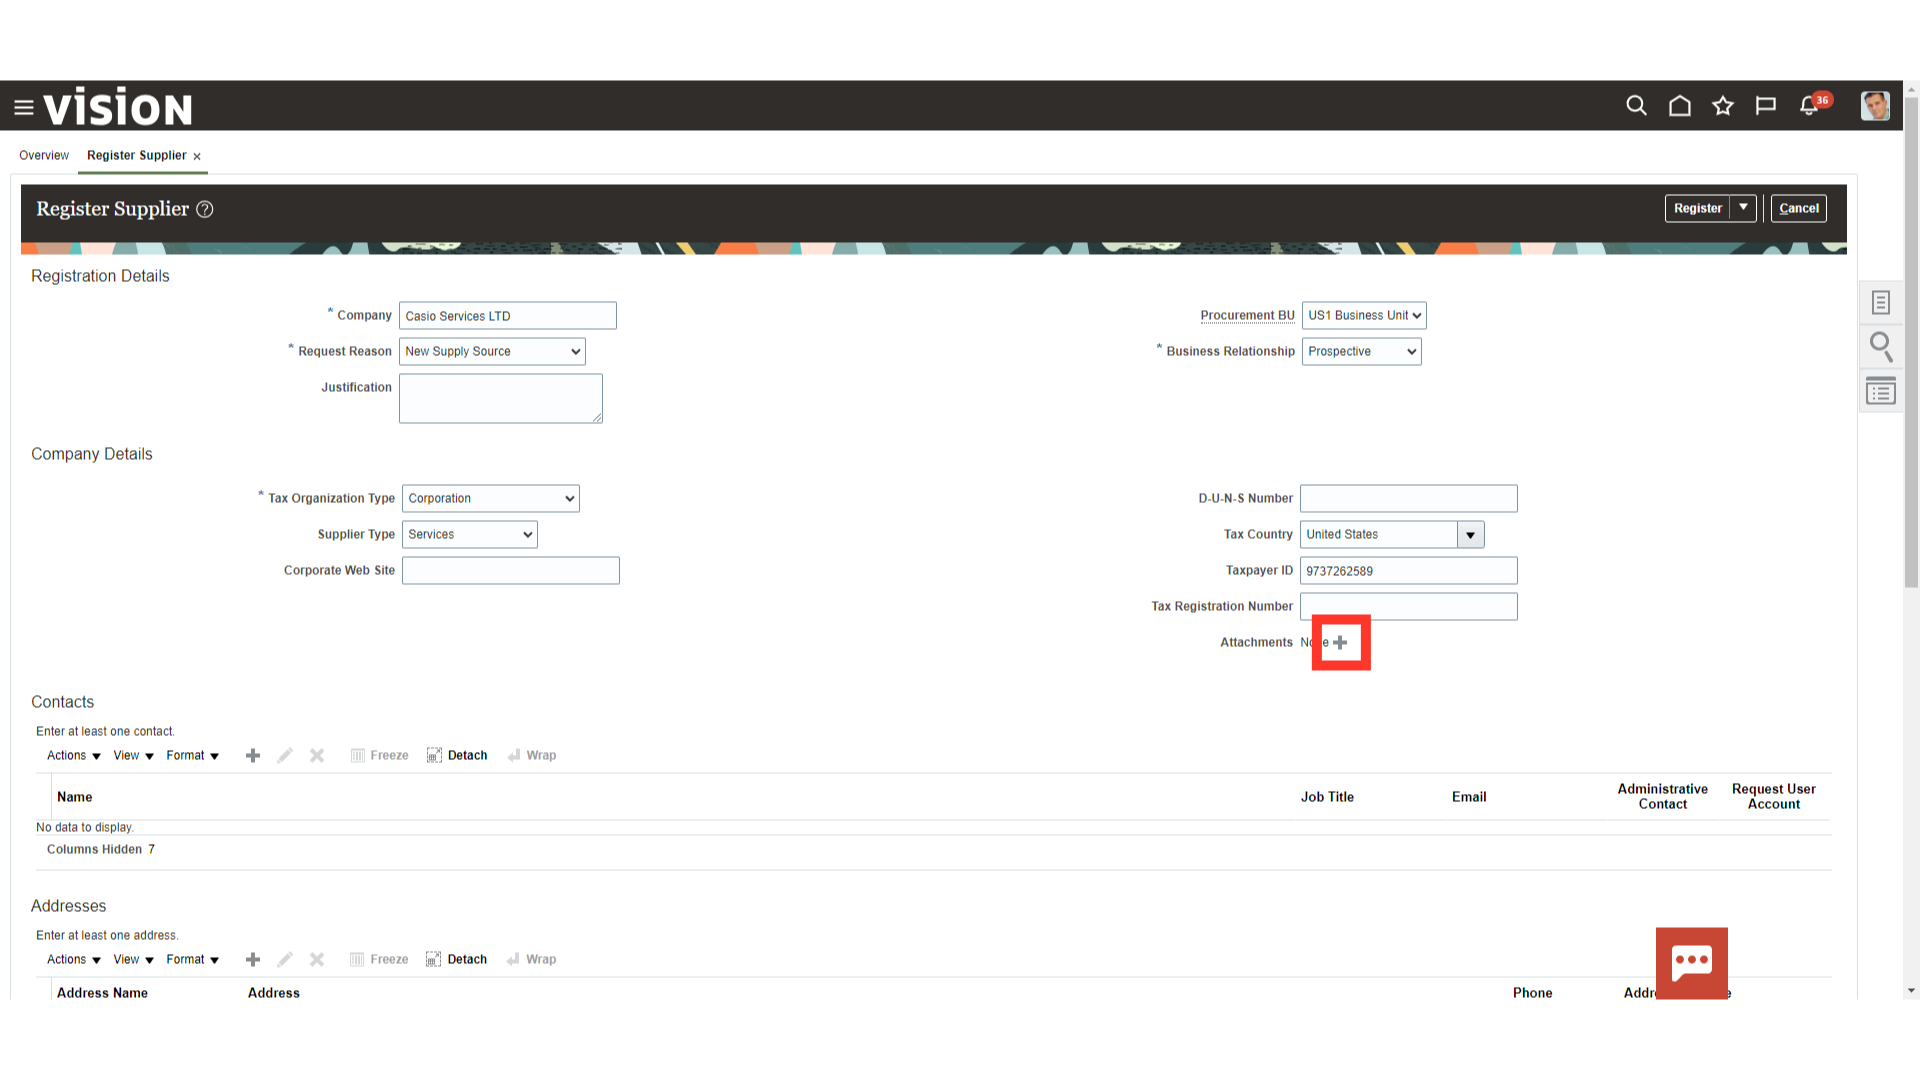
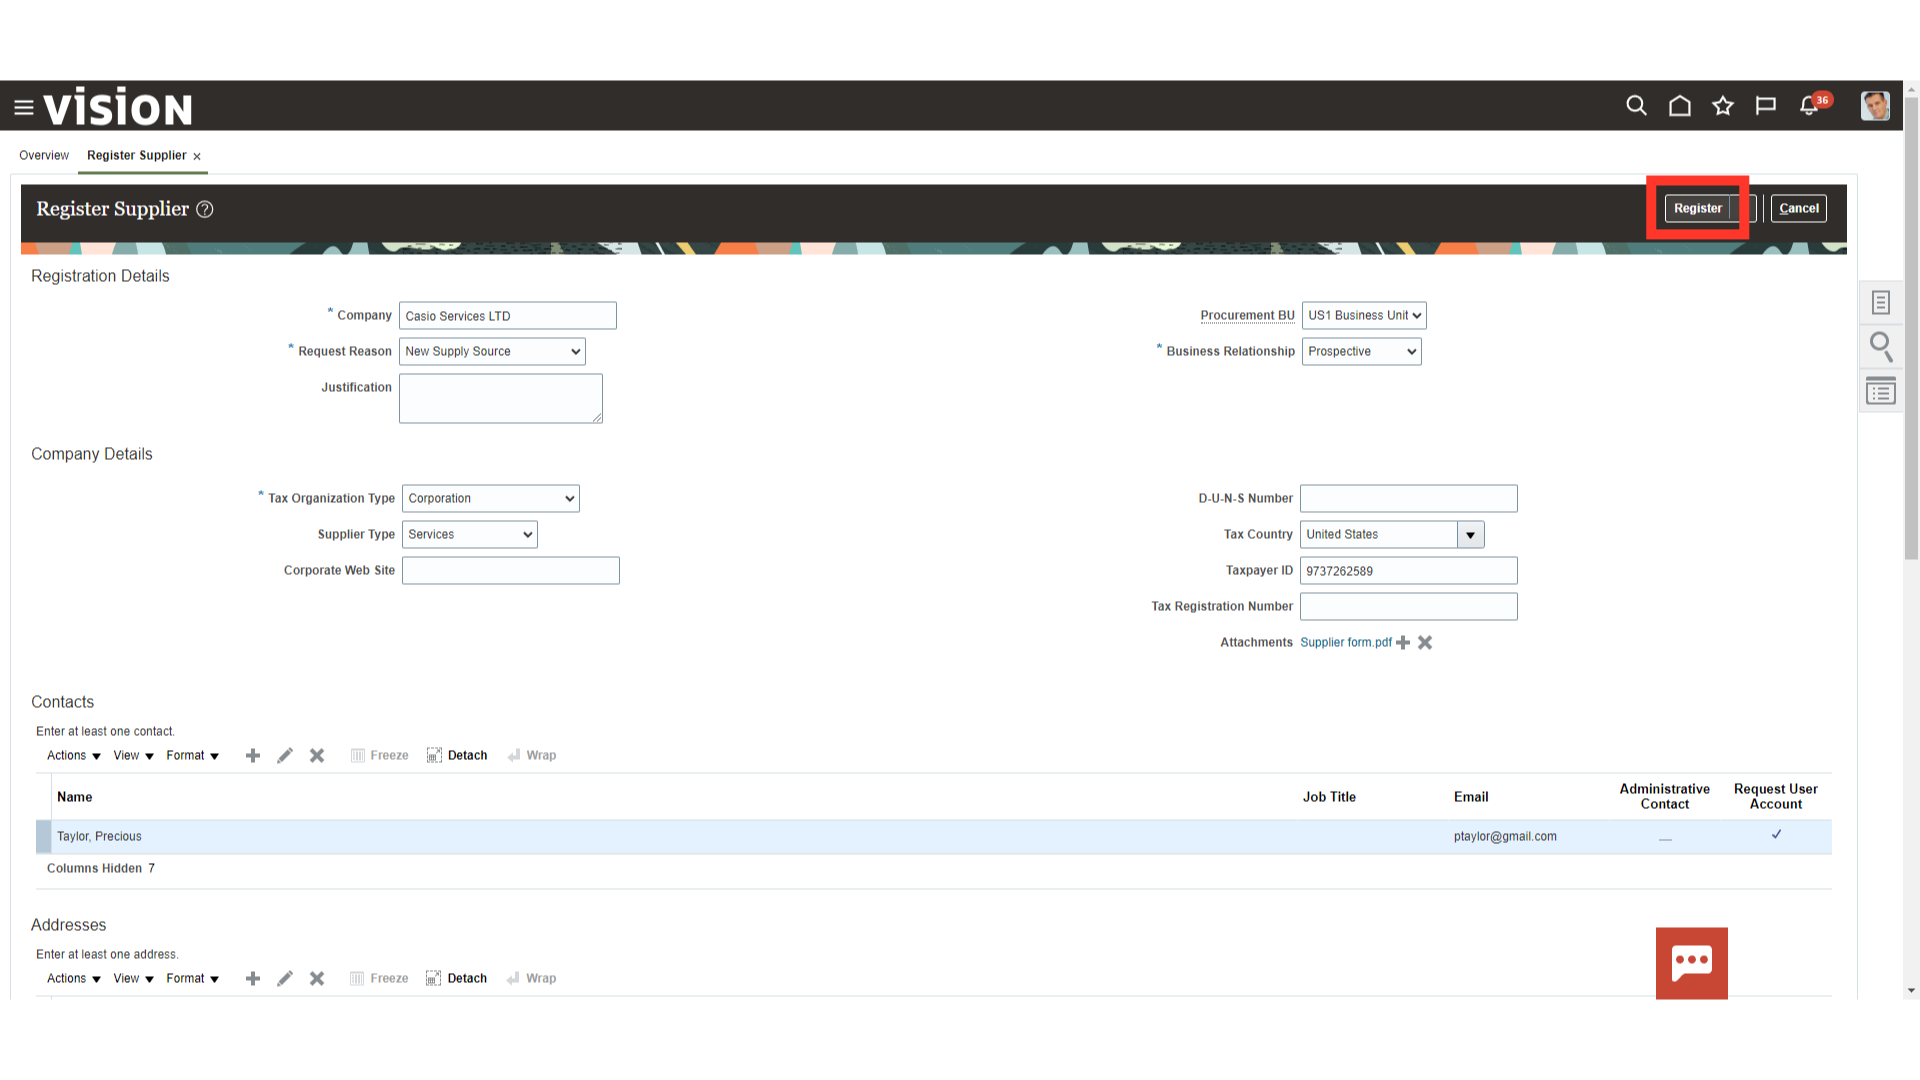
In the Company field enter the name of the Supplier. For demonstration purpose, supplier name “Casio Services LTD” is entered in the designated field.
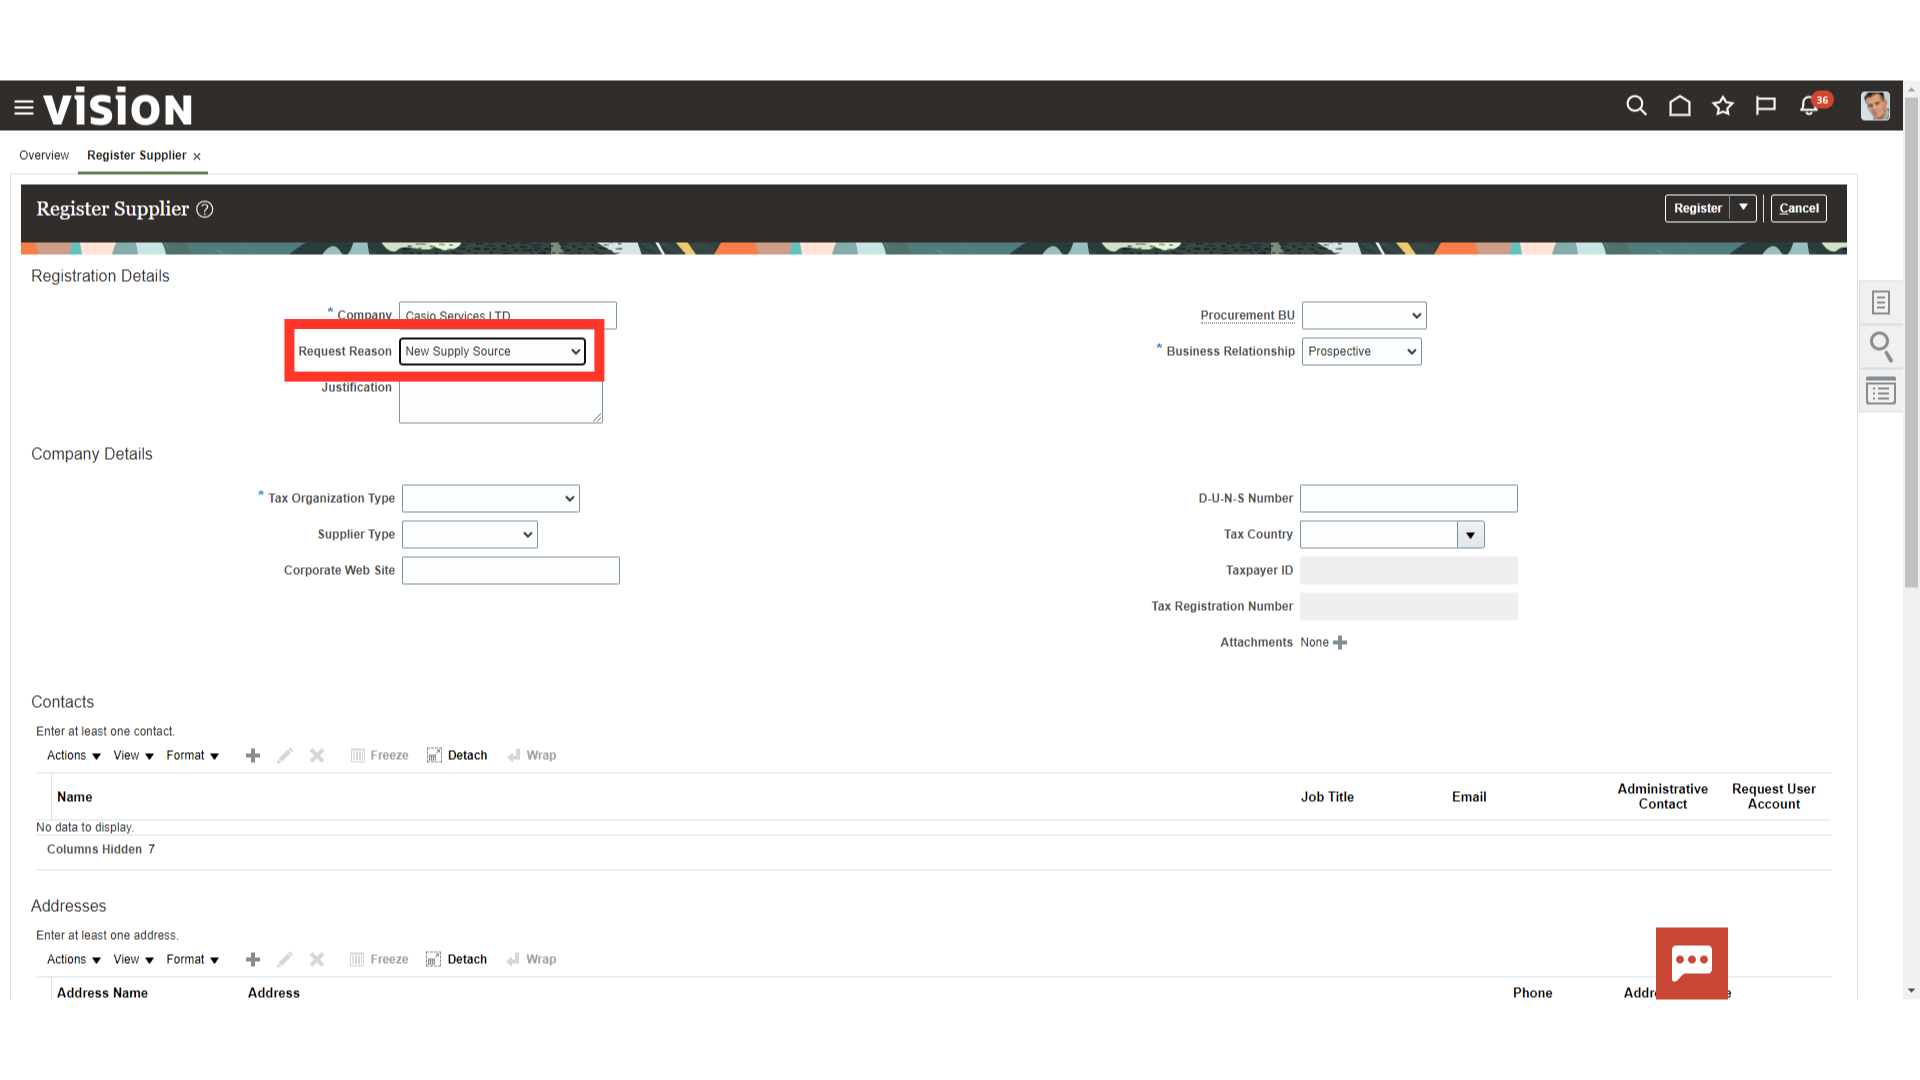
The field Request reason is a list of value, and each value is used for specific purpose for which the supplier registration process is being done such as,
Check Request: It will be used as Registration Request Reason of check payment for a one-off supplier.
New Supply Source: It will be used for a new Supplier
One-Time Supplier Request: For supplier for which is to be used as a One-Time supplier. Sourcing Supplier Registration: It will be used for Registering a new supplier during the sourcing negotiation process.
Here we have used the ‘New Supply Source’ option for demo purpose.
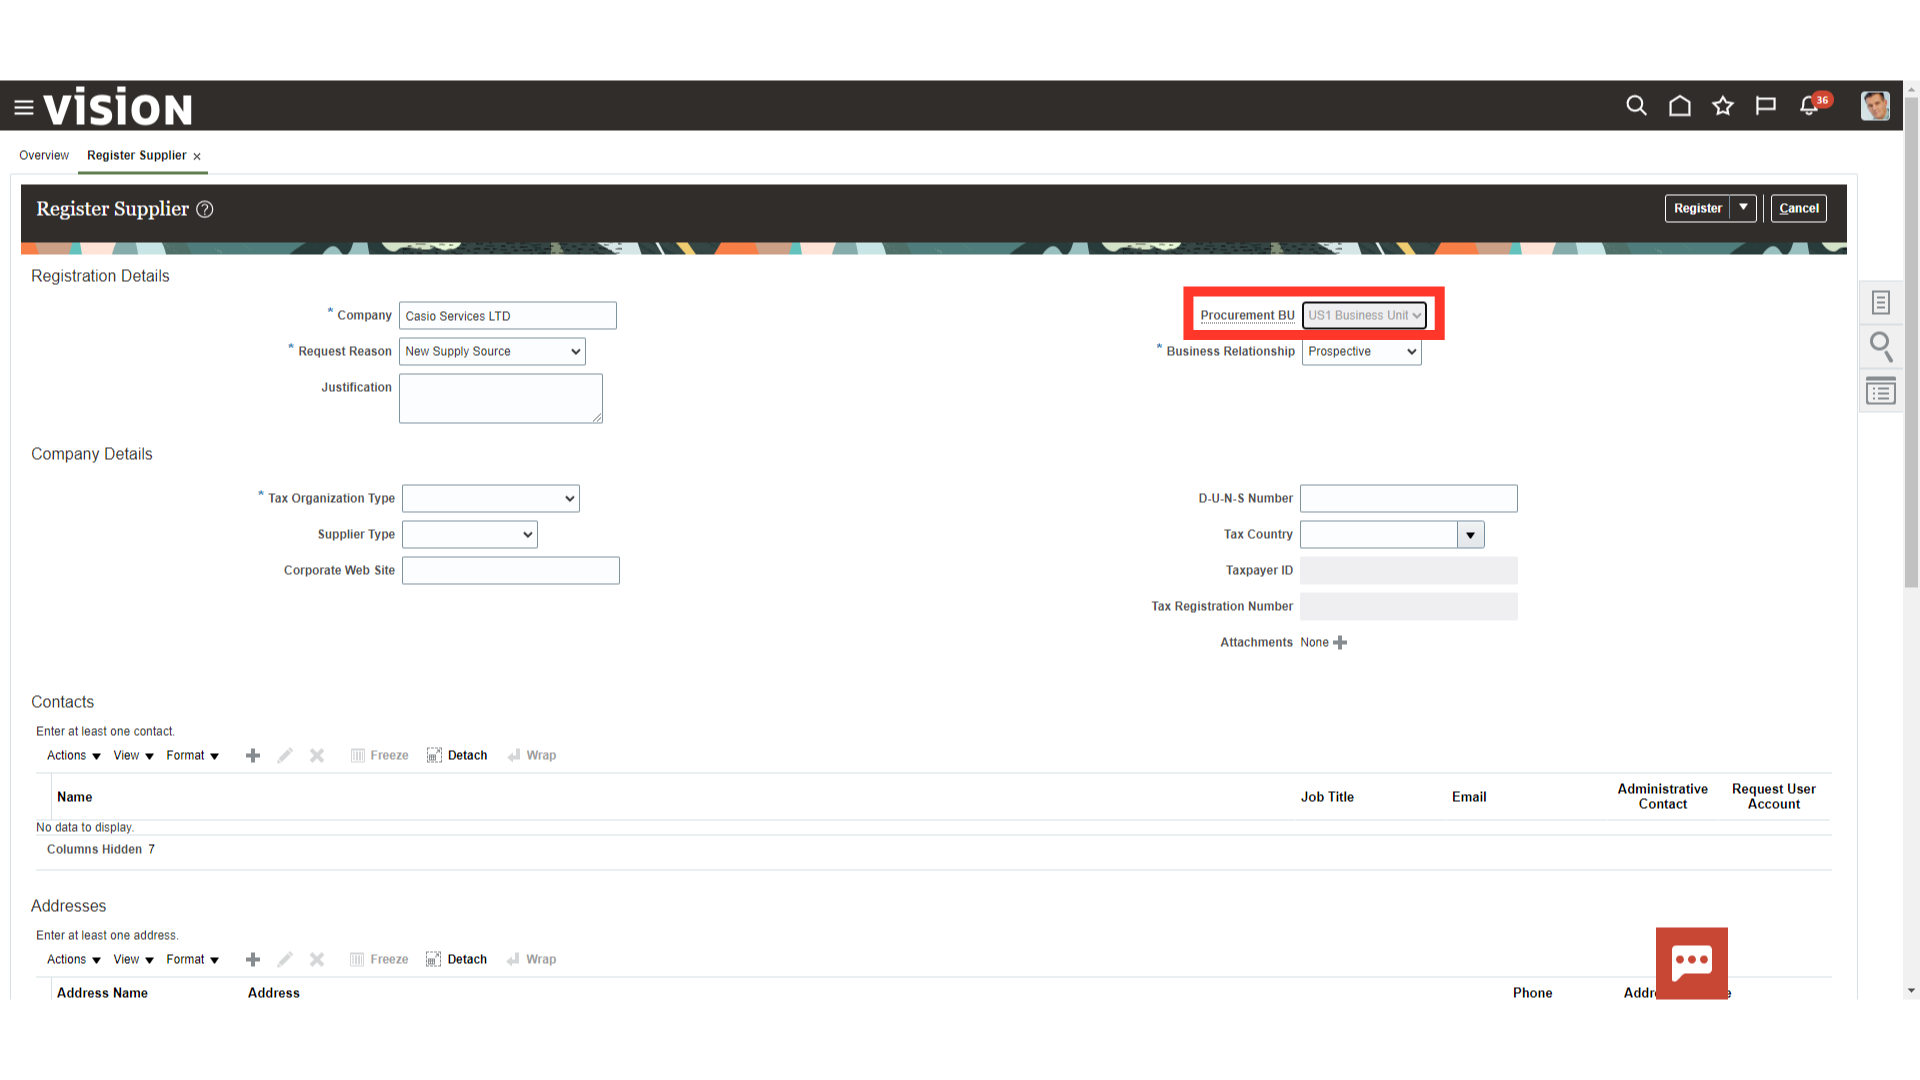
Enter the Procurement BU. If procurement BU is selected, then same will be used to create sites for the supplier. “US1 Business Unit” is selected here for Demo purpose.
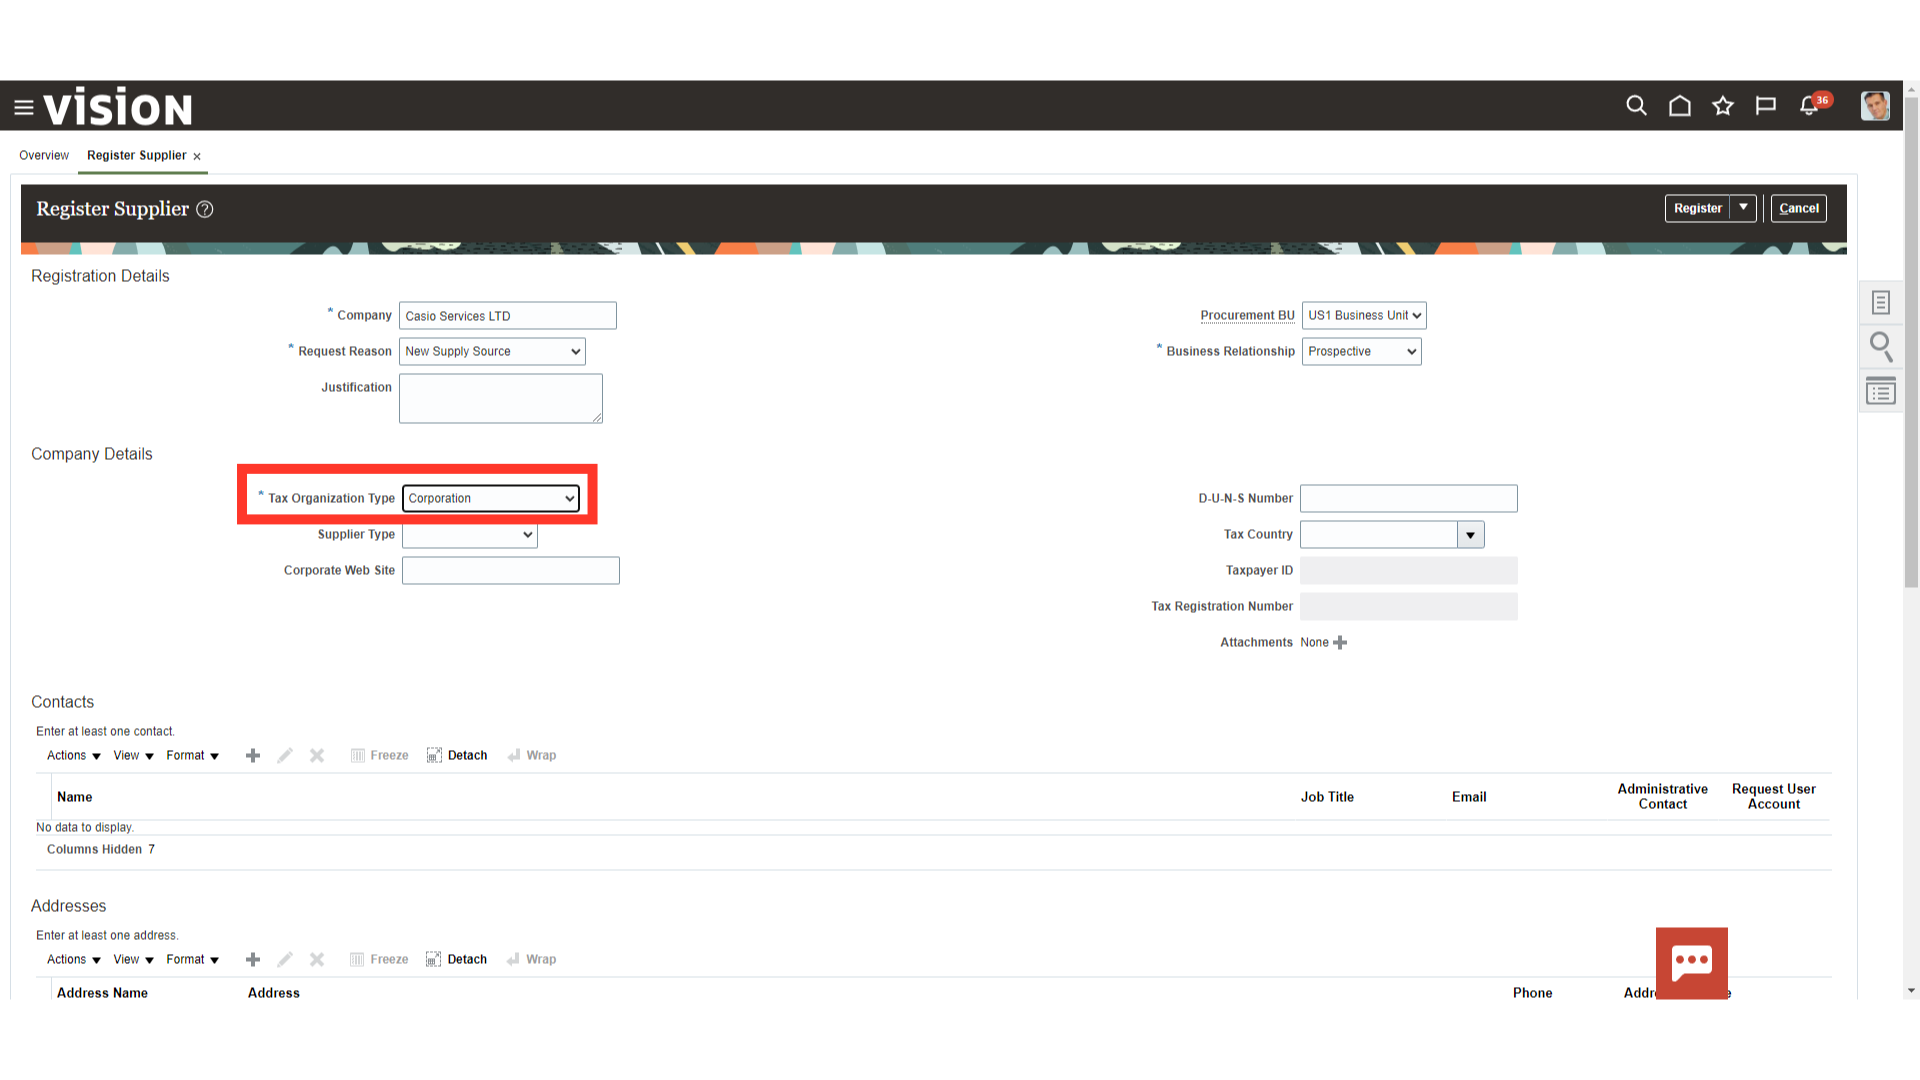
Enter the Tax Organisation type of the supplier being registered.
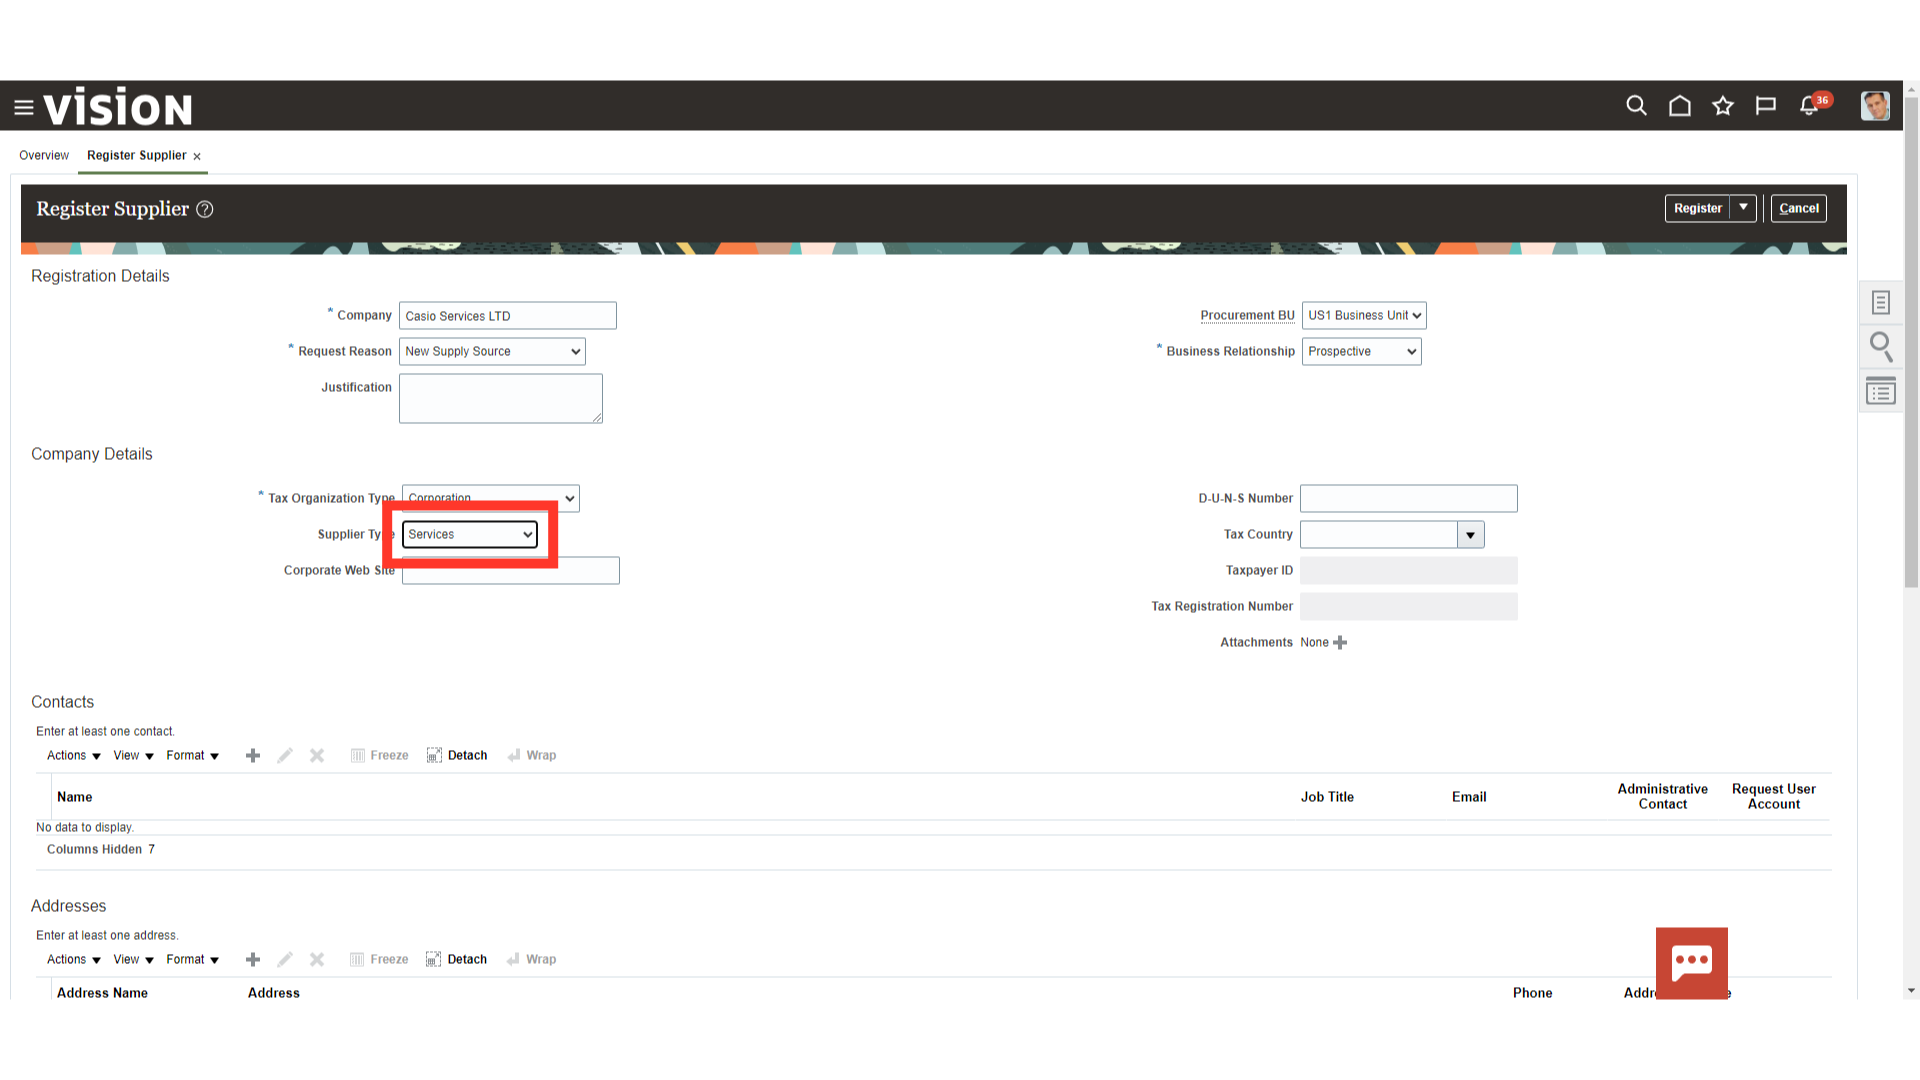
Supplier Type is an attribute to categorize suppliers to support supplier reporting and analysis. Select the Supplier type from the list of values available, as applicable. Value ‘Services’ is selected here for demo purpose.
Select the Tax Country of the tax jurisdiction applicable to the supplier.
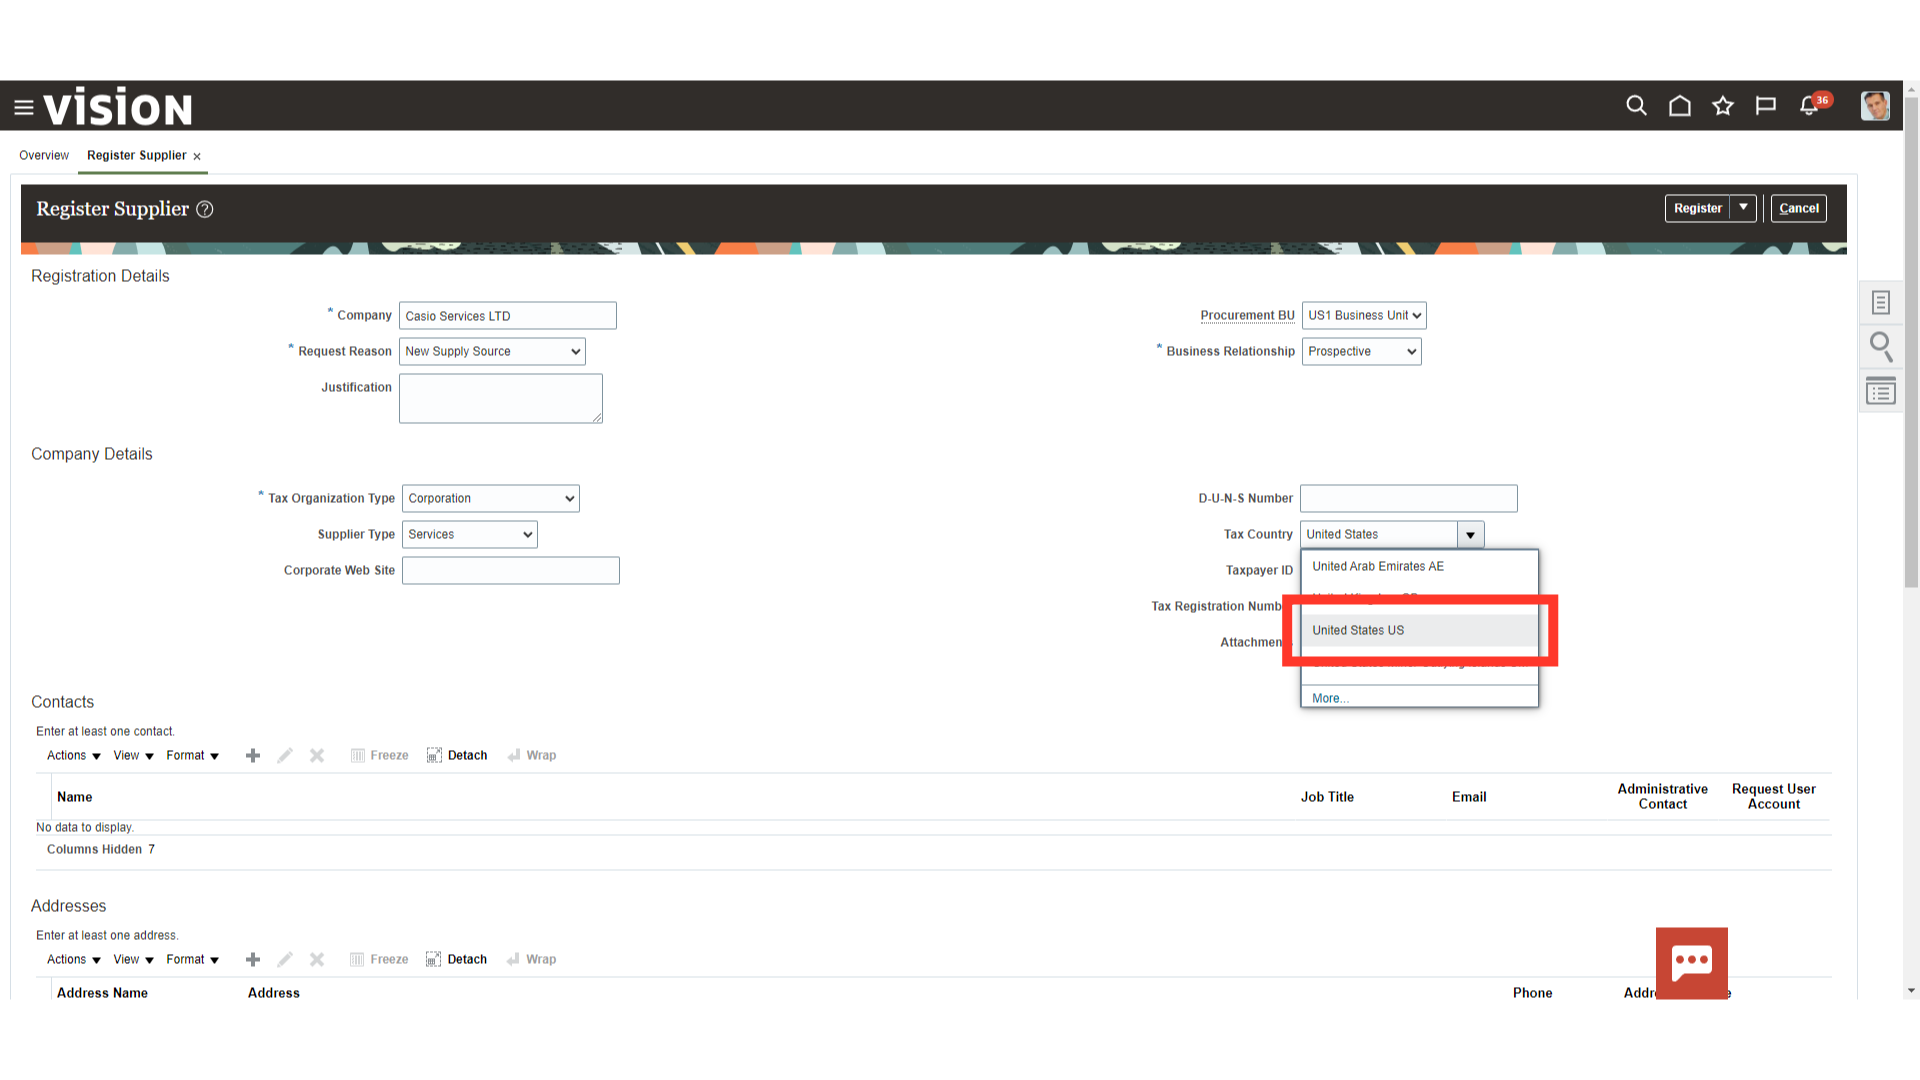
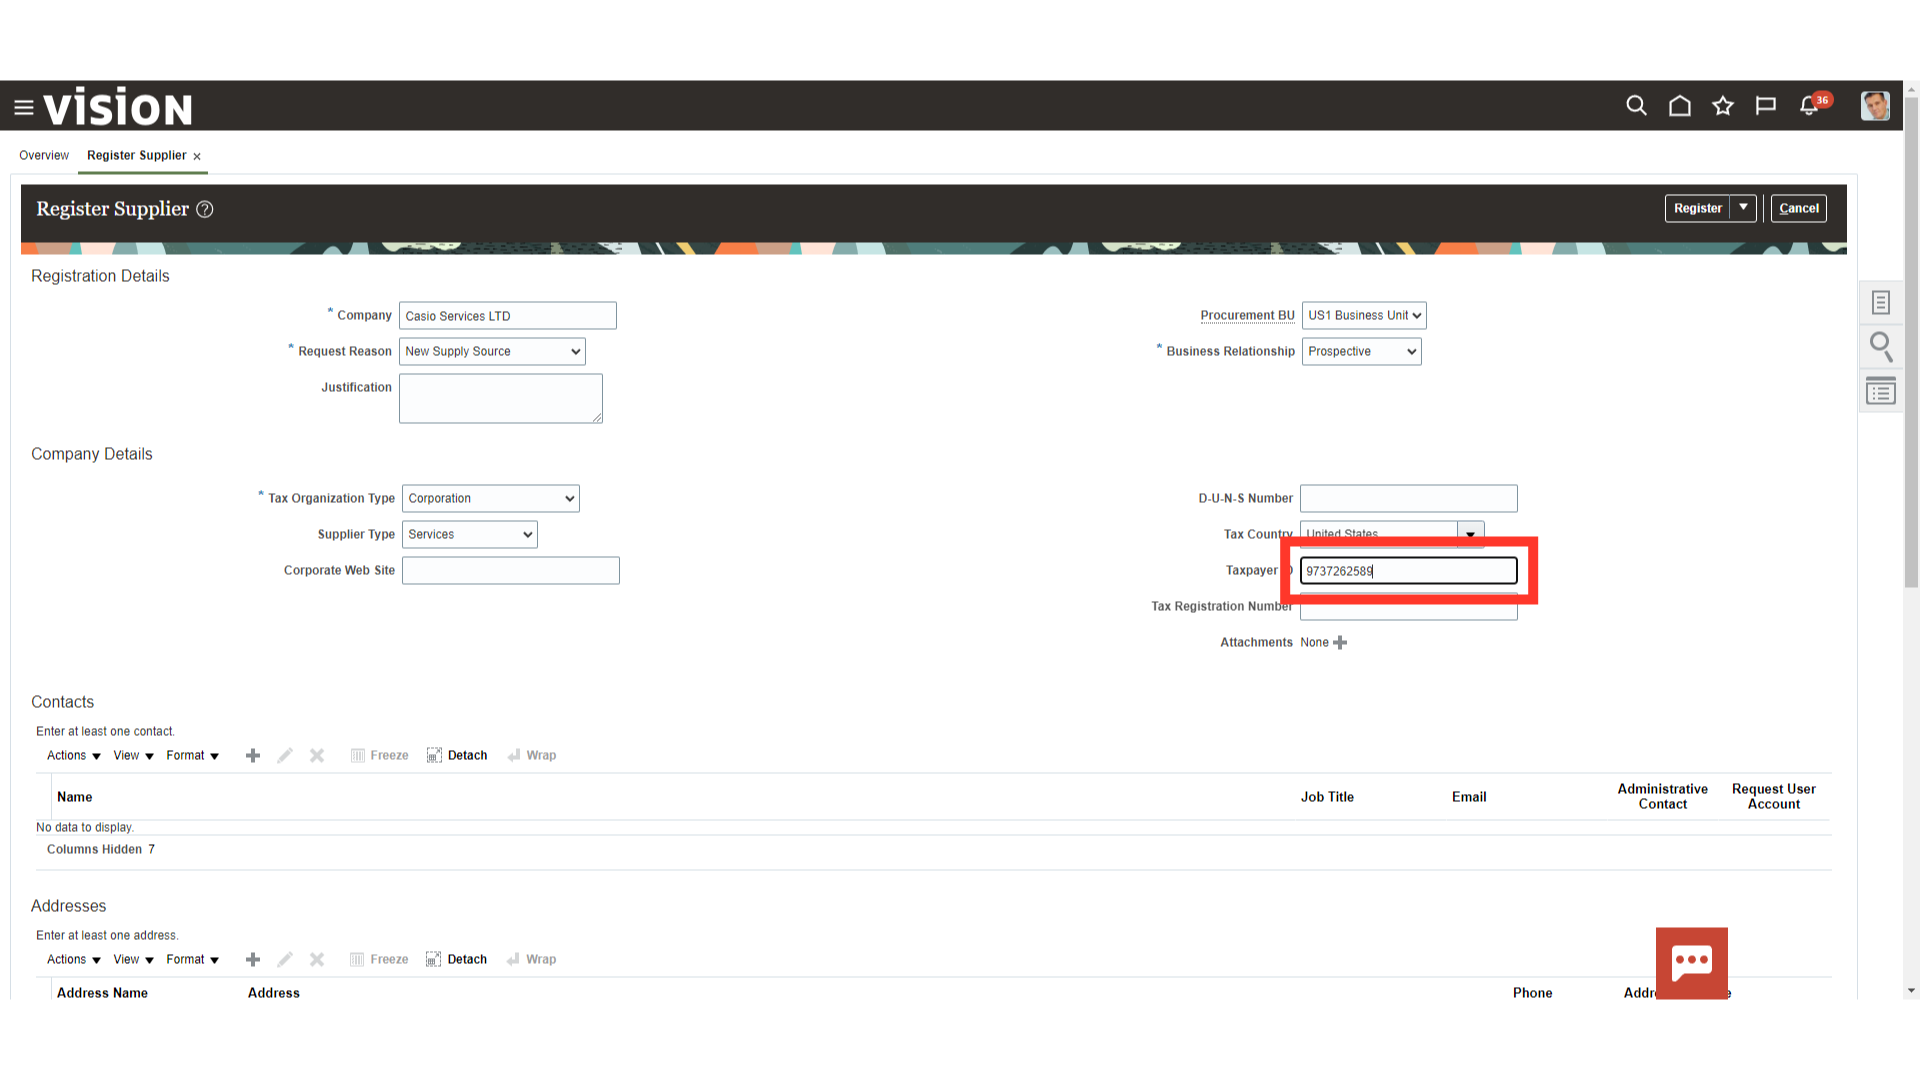
Based on the Tax Country selected, relevant fields will become active. Enter the Taxpayer number of the supplier.
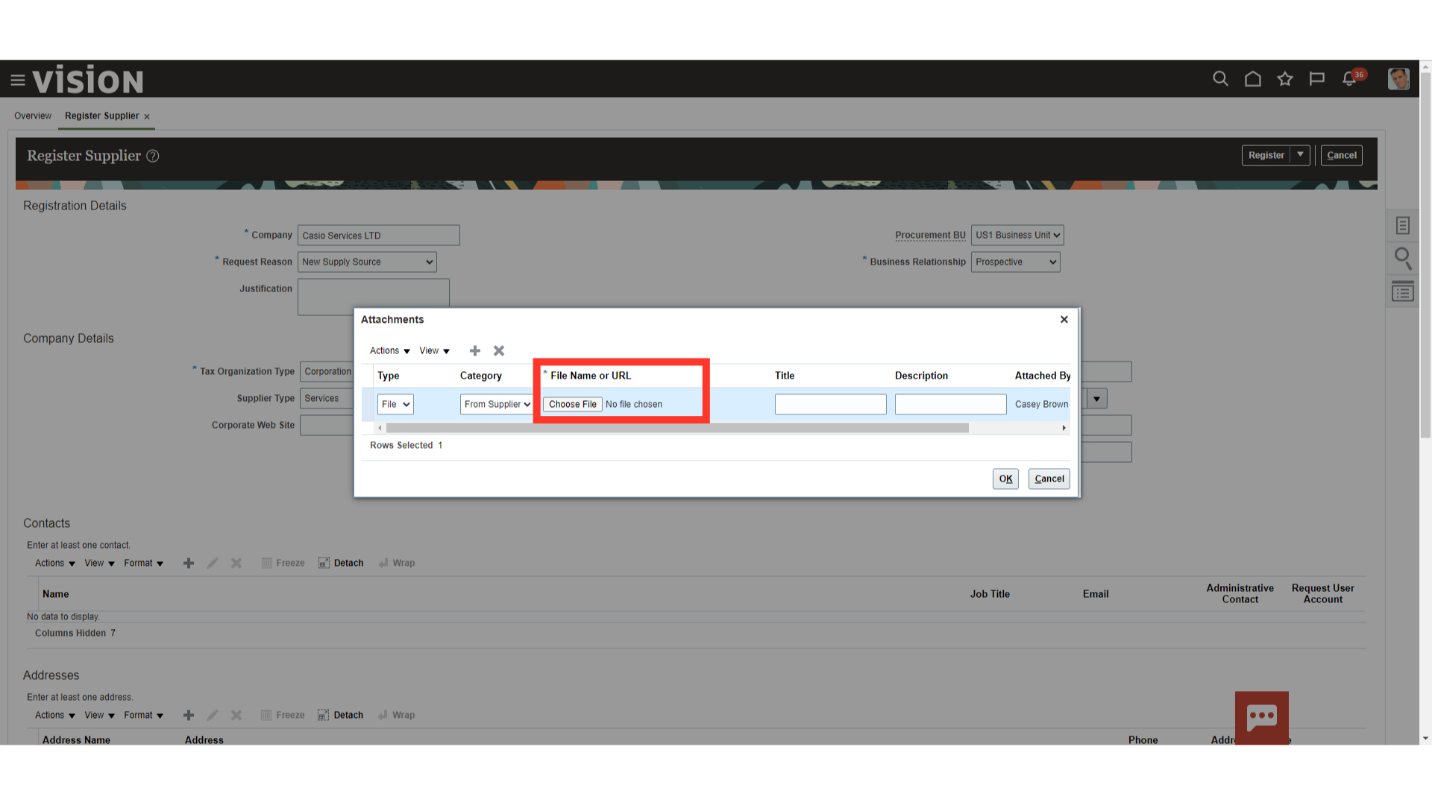
Click on the plus icon to add the required attachments. It may include any Proof of identity required or the authorization received for the supplier creation, or any other documents required as per the company policy.
There are multiple types of attachments you can provide. You may provide the link of the document if it is stored in some shared space. Or you may provide a copy from your system itself. In this guide the attachment type ‘File’ is being used for demo purpose. Click on the Choose File button to select the file from the local system.
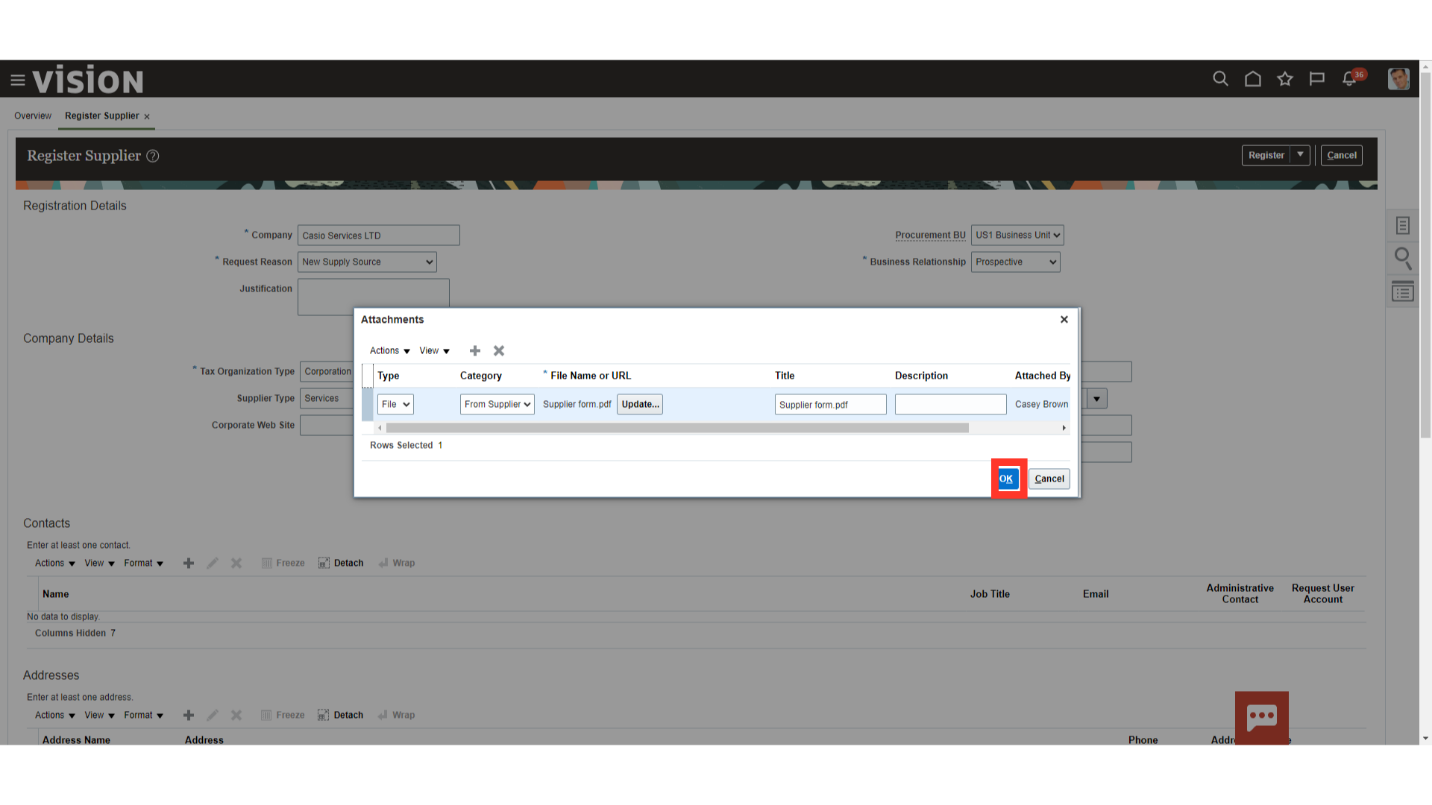
Once the document is attached. Click on ‘Ok’.
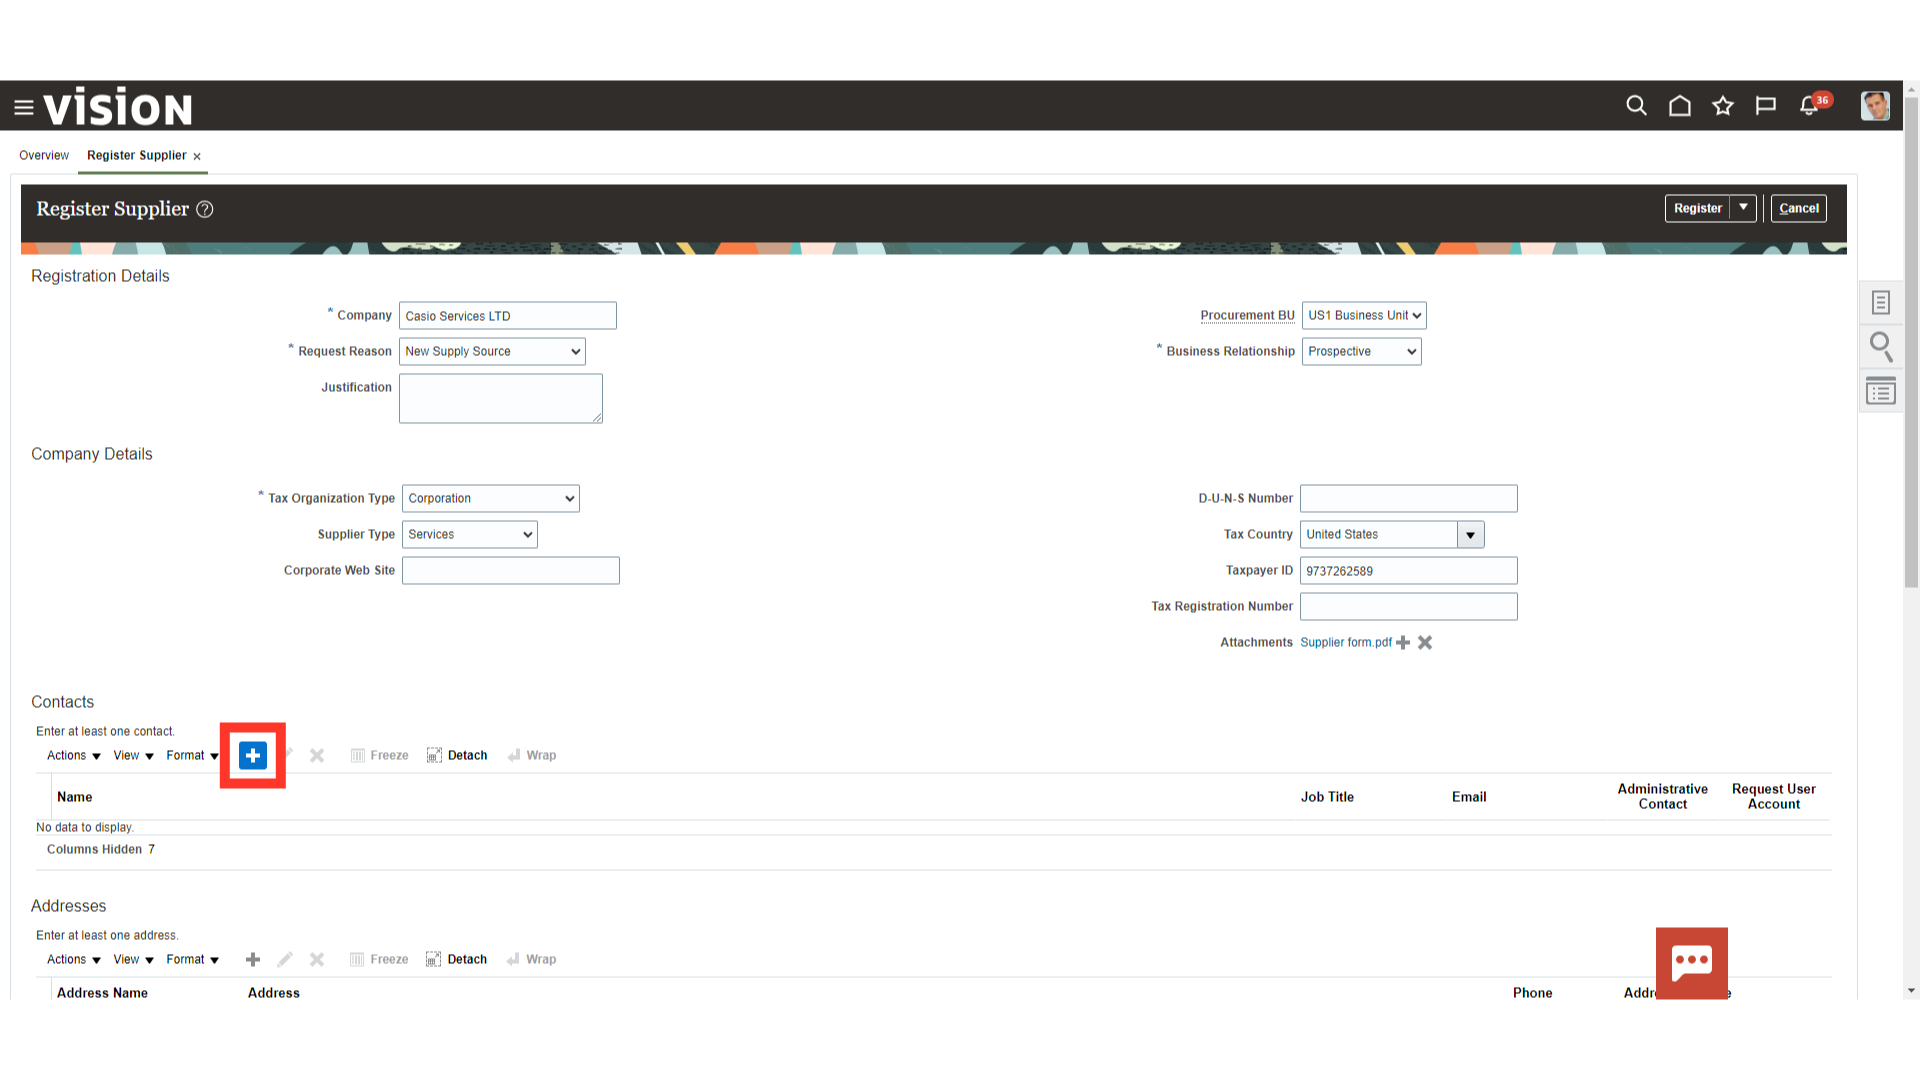
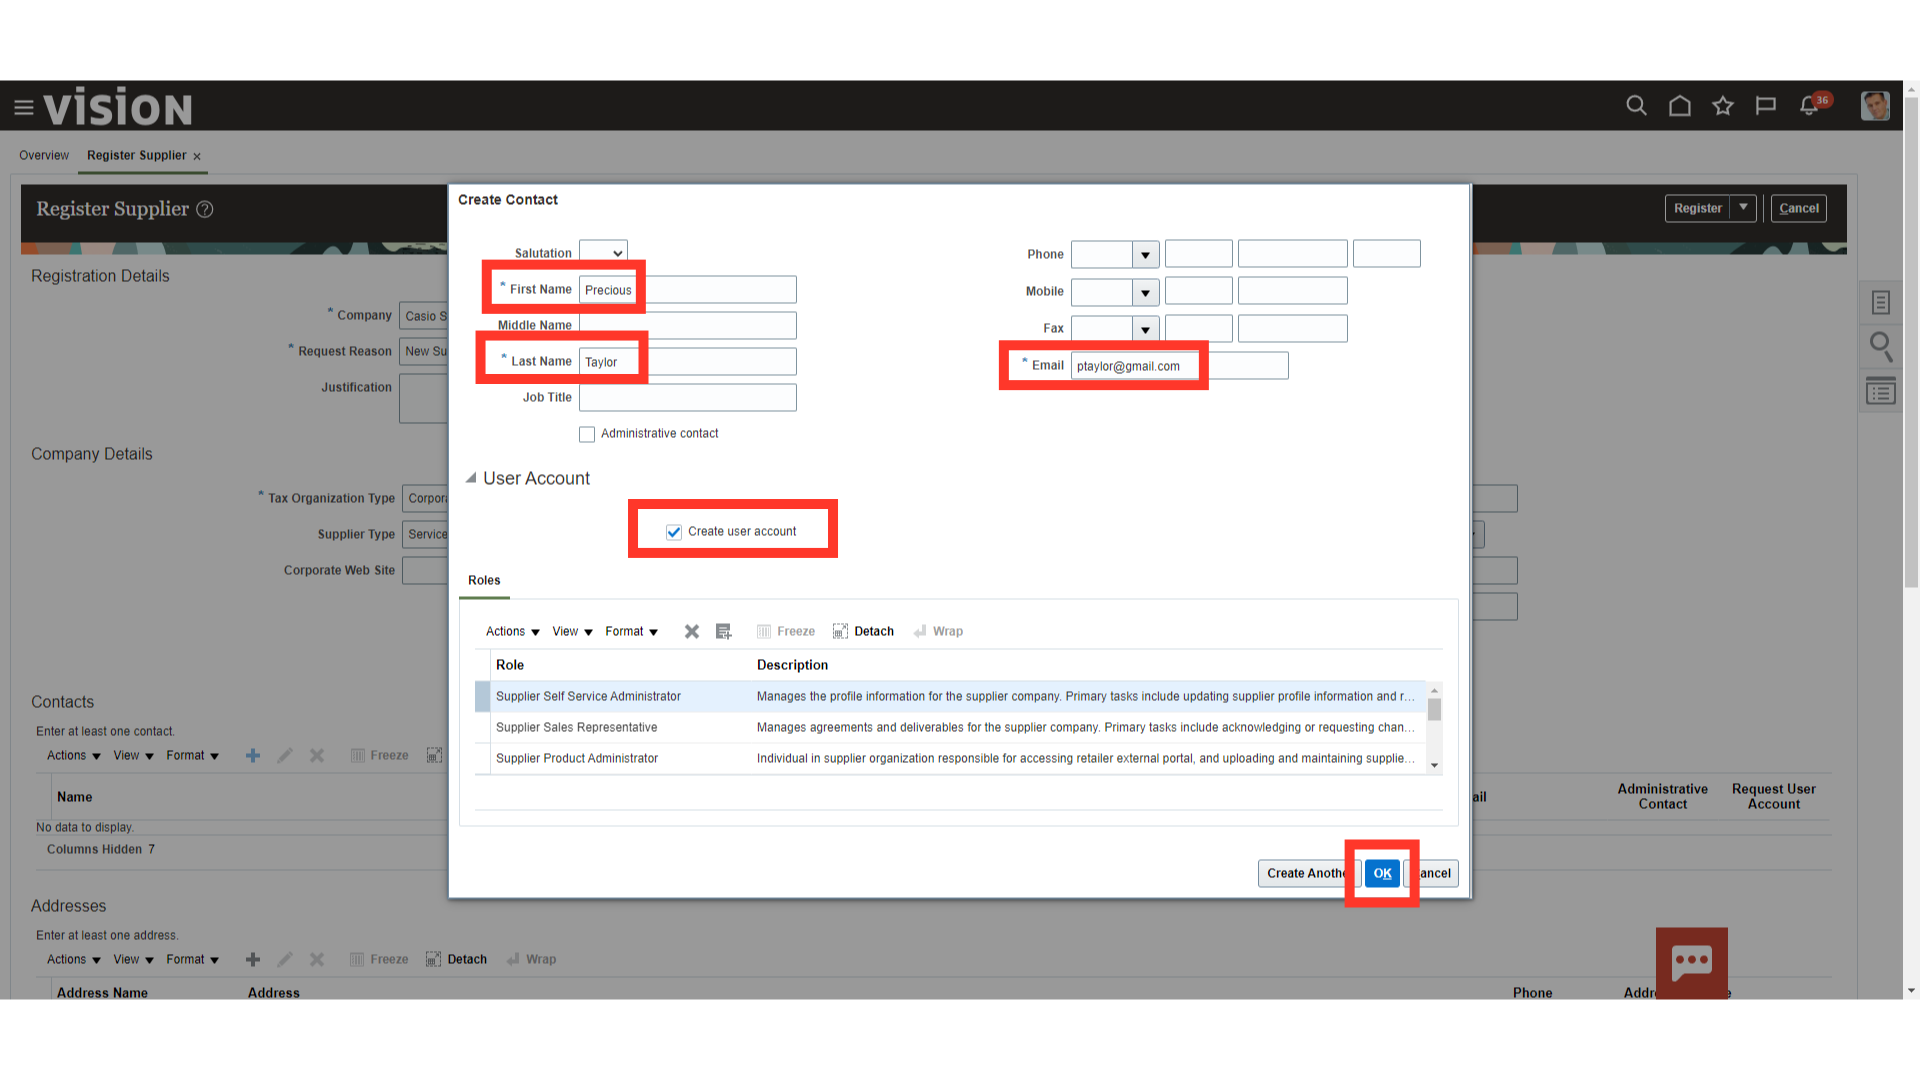
To add the contact details of the supplier, click on the plus icon in the Contacts section.
Enter First Name, Last Name, Email Id of the Contact person of the supplier. Next select the Create User Account check box. This user account created will be used by the supplier to login and submit invoices. The Roles section decides the quantum of access available to the User account. Select “OK” to confirm.
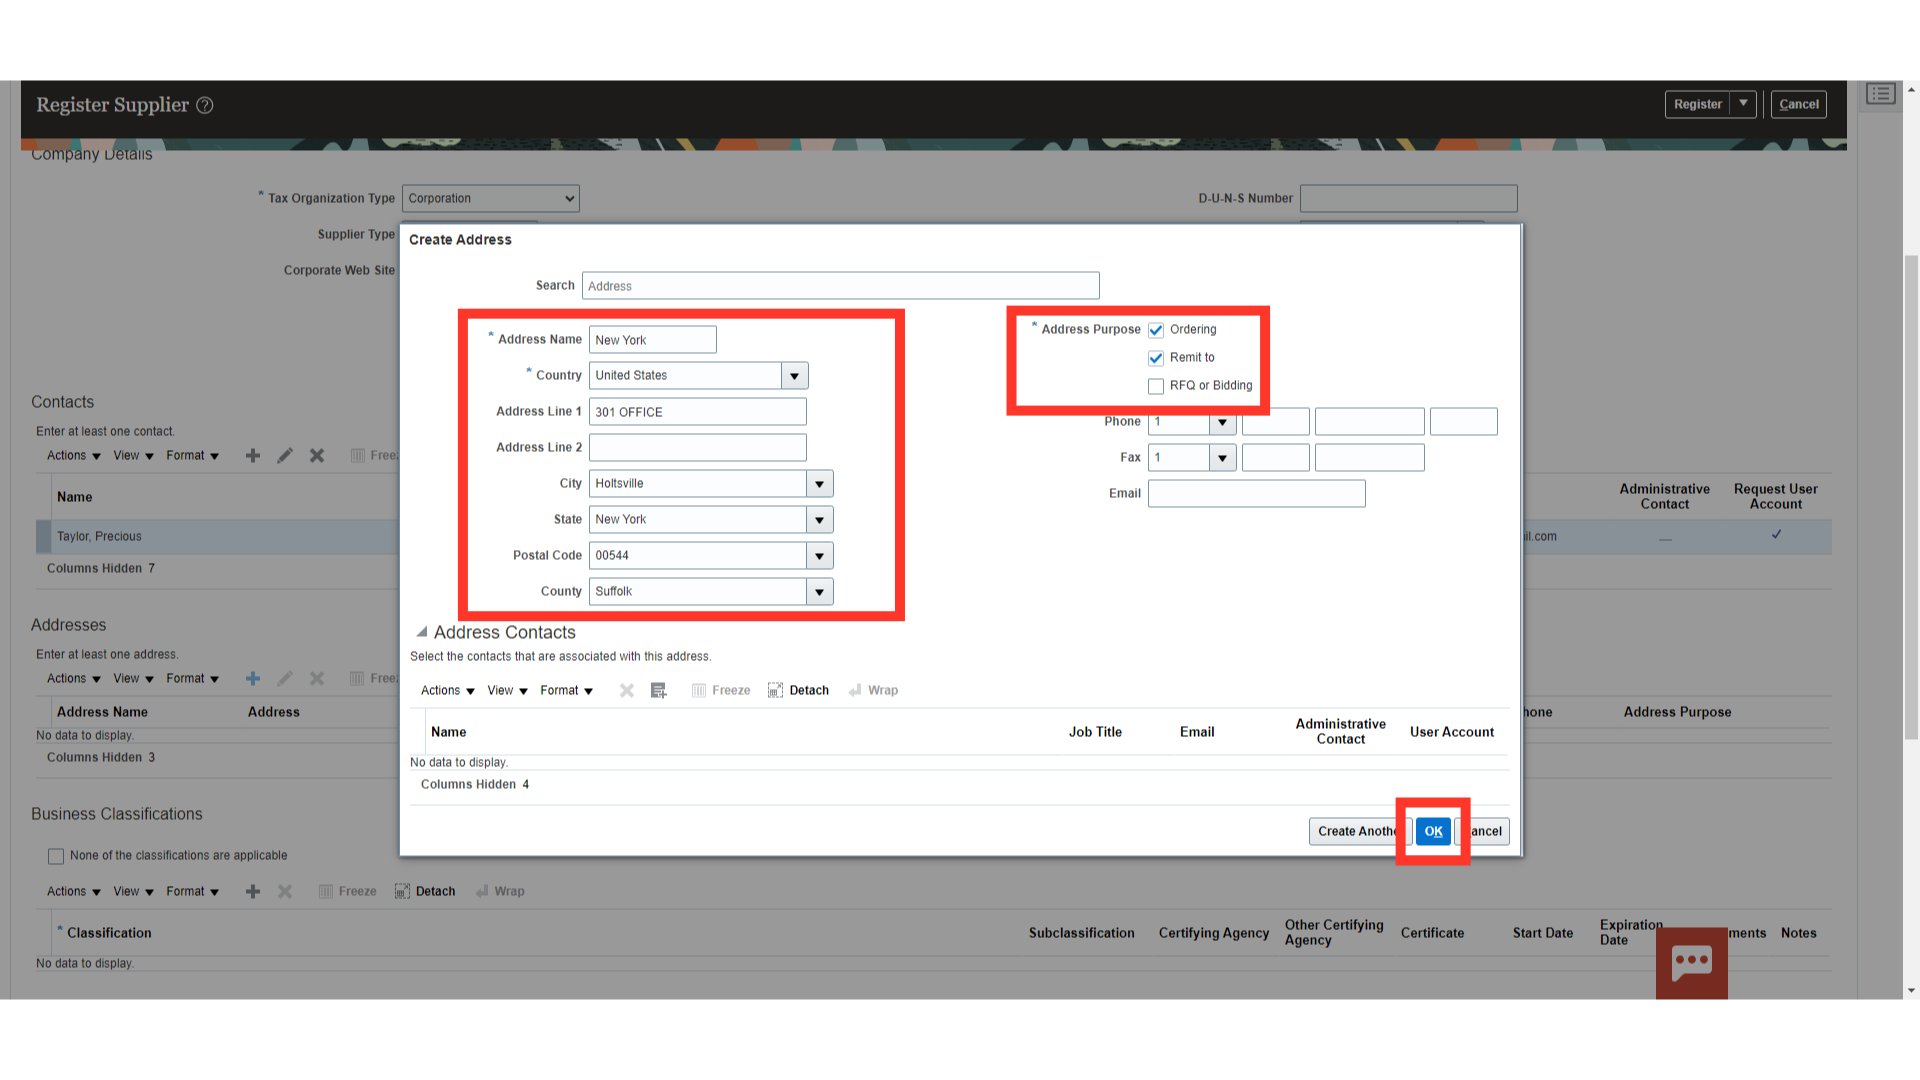
To add the address of the Supplier, click on the plus icon under the Addresses section.

On the Pop-up screen, enter the Address name with which you can identify the location. Select the country of the supplier and enter its address which would be used for generating RFQs, Purchase Orders, Invoices, Remittances. Enter all the relevant fields of address. Select the purpose of the address as to whether it will be used either for Ordering or Remit to (Remittance) or for submitting RFQ/Bidding. An address can be used for multiple purposes. Select “OK” to confirm.
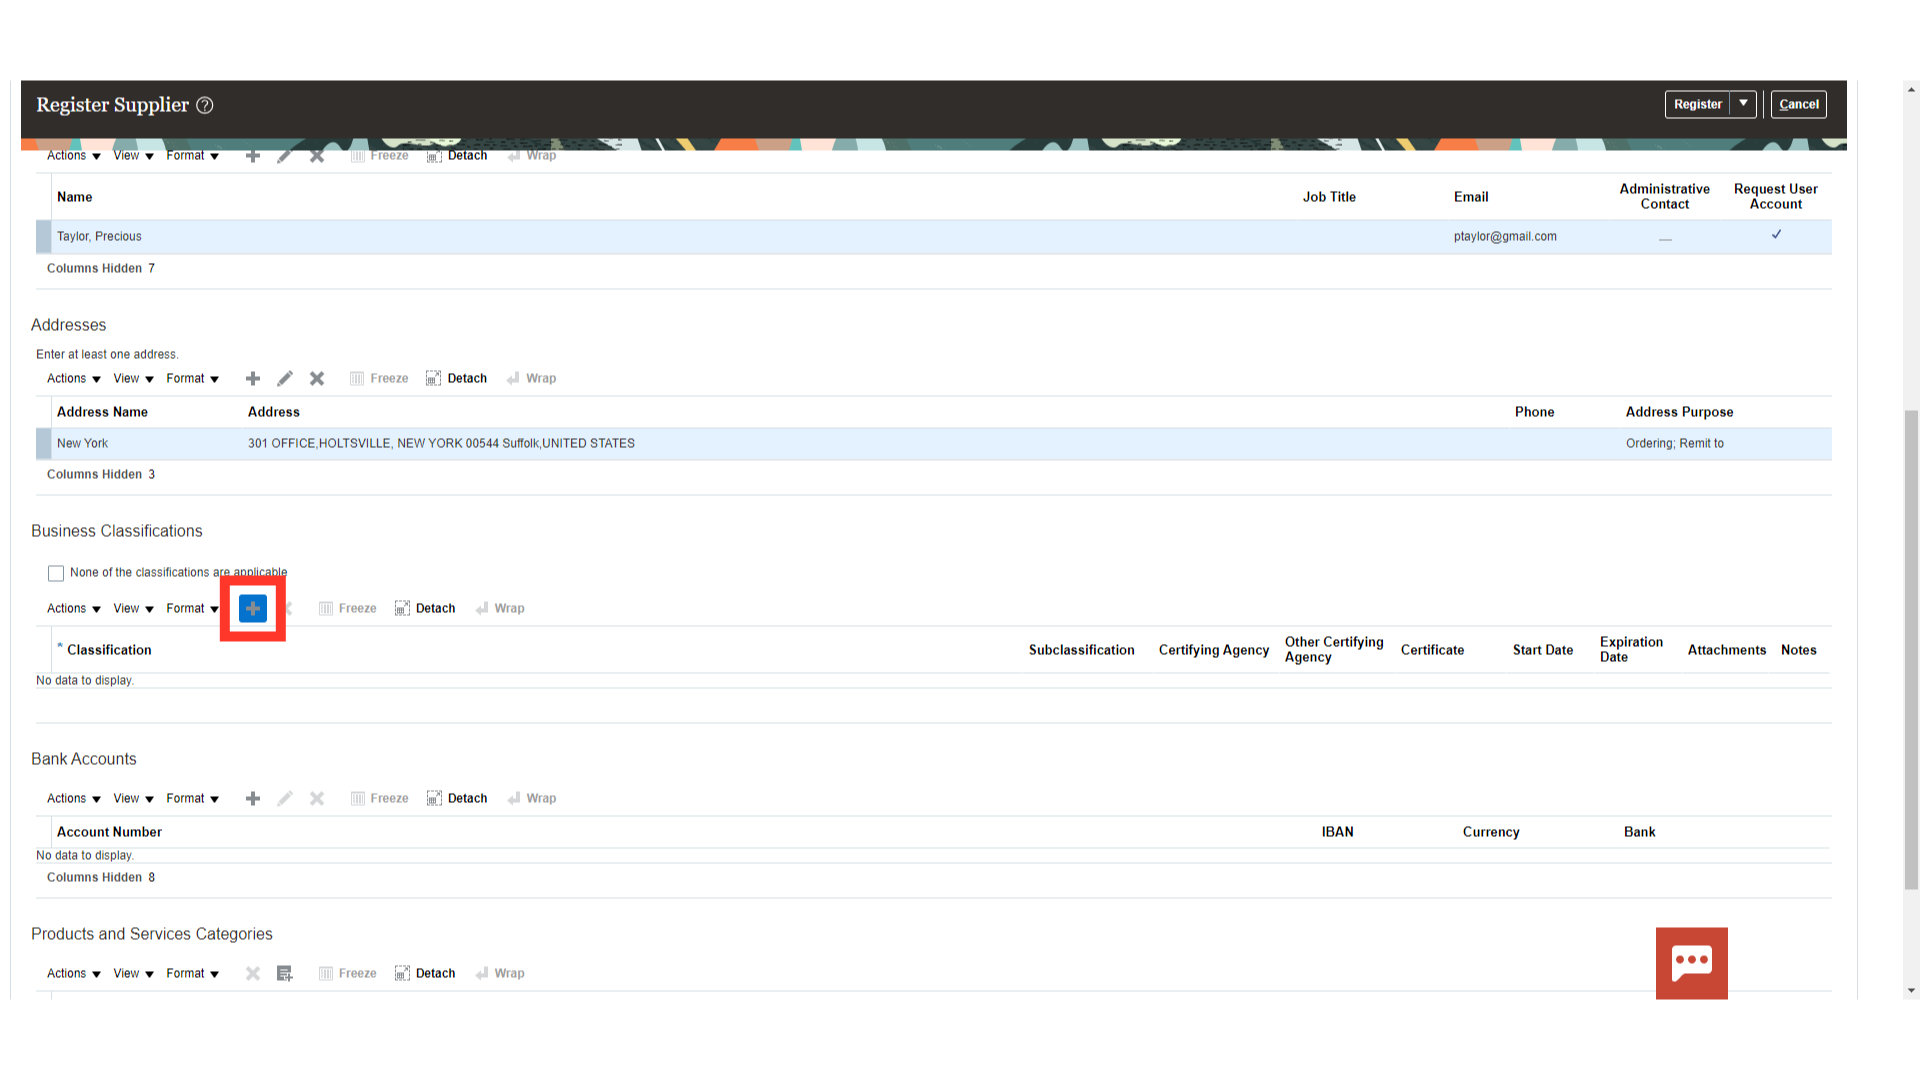
Business classification stores details related to a supplier’s business classifications that support the tracking of supplier certifications that are important to companies for different reasons. To add the certification details, click on the plus icon under the Business Classifications section.
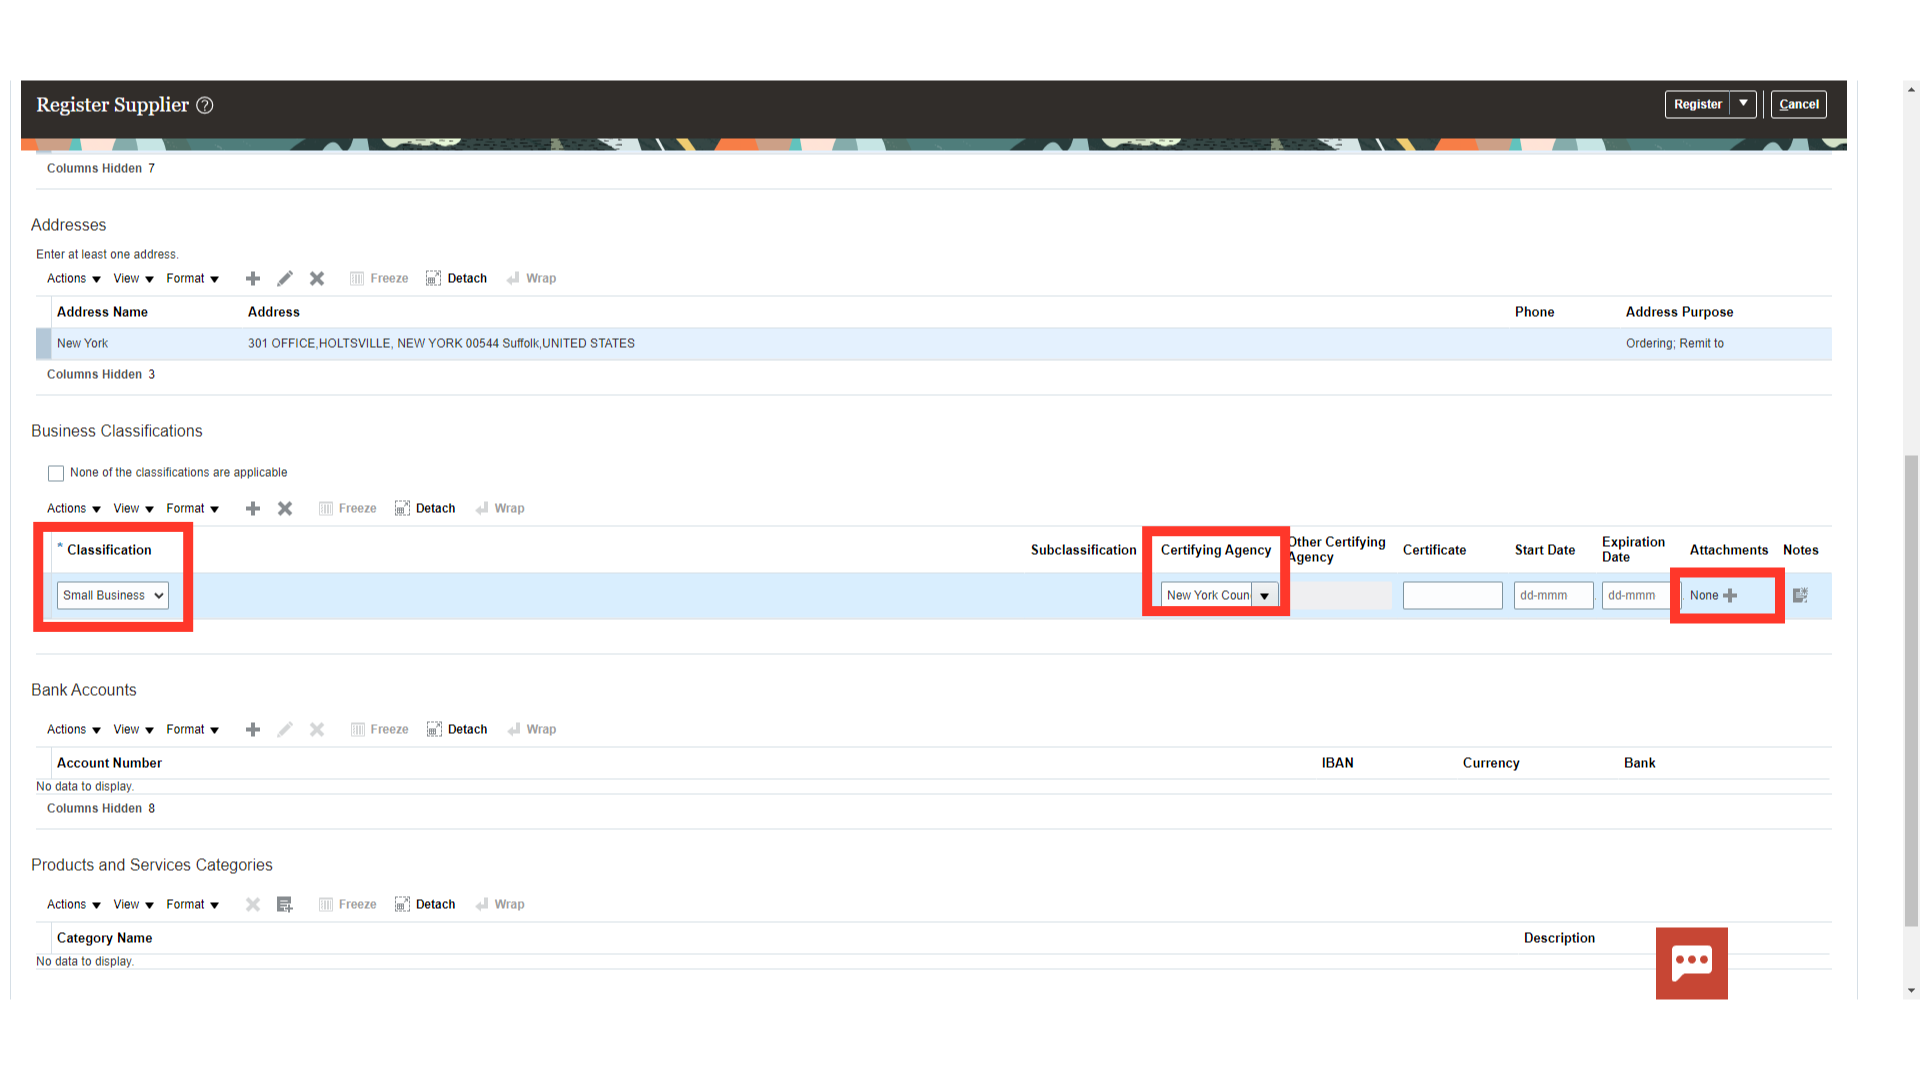
Select the Classification, Certifying Agency and add the Certificate in Attachments as appropriate.
To pay suppliers electronically, a bank account is required in the supplier profile. You can set up a supplier bank account at these levels: Supplier level, Supplier address level and Supplier site level. If supplier bank account is required to be setup click on the plus icon. This will setup the bank account at Supplier level.
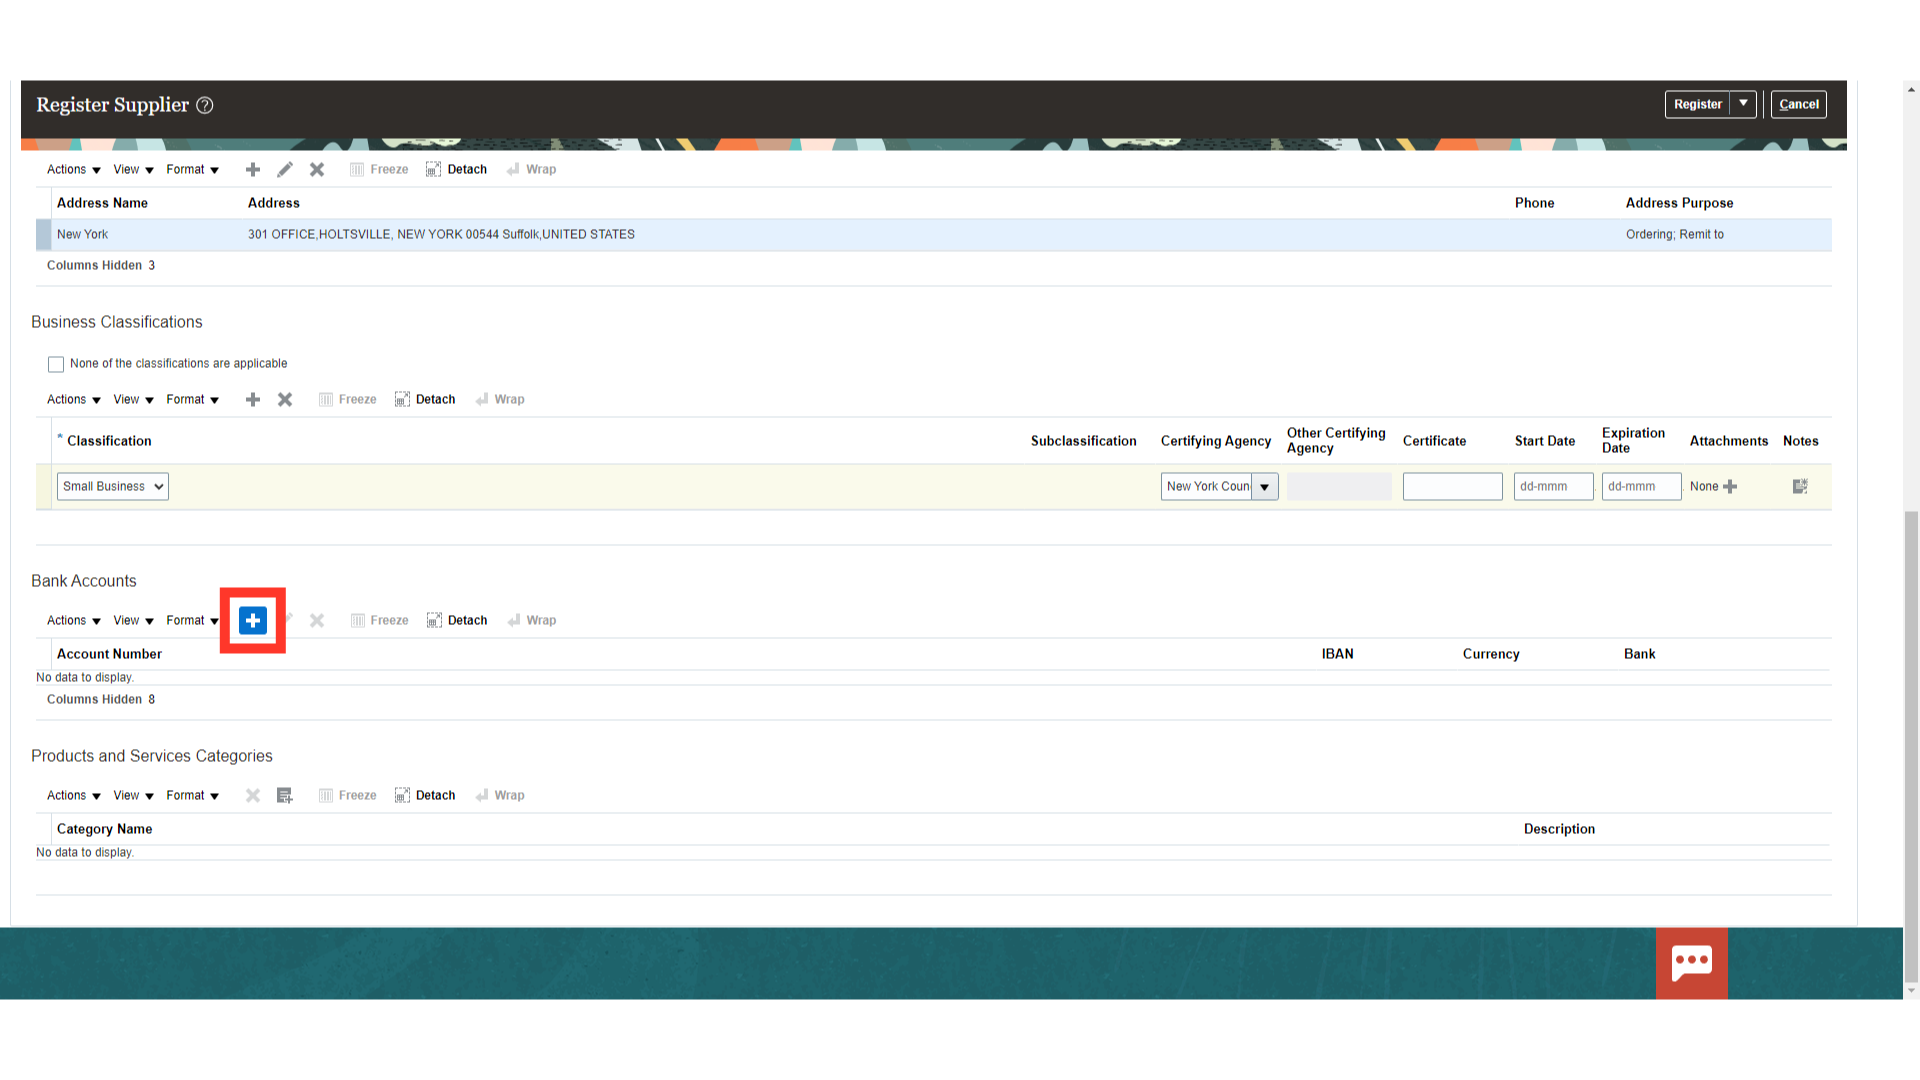
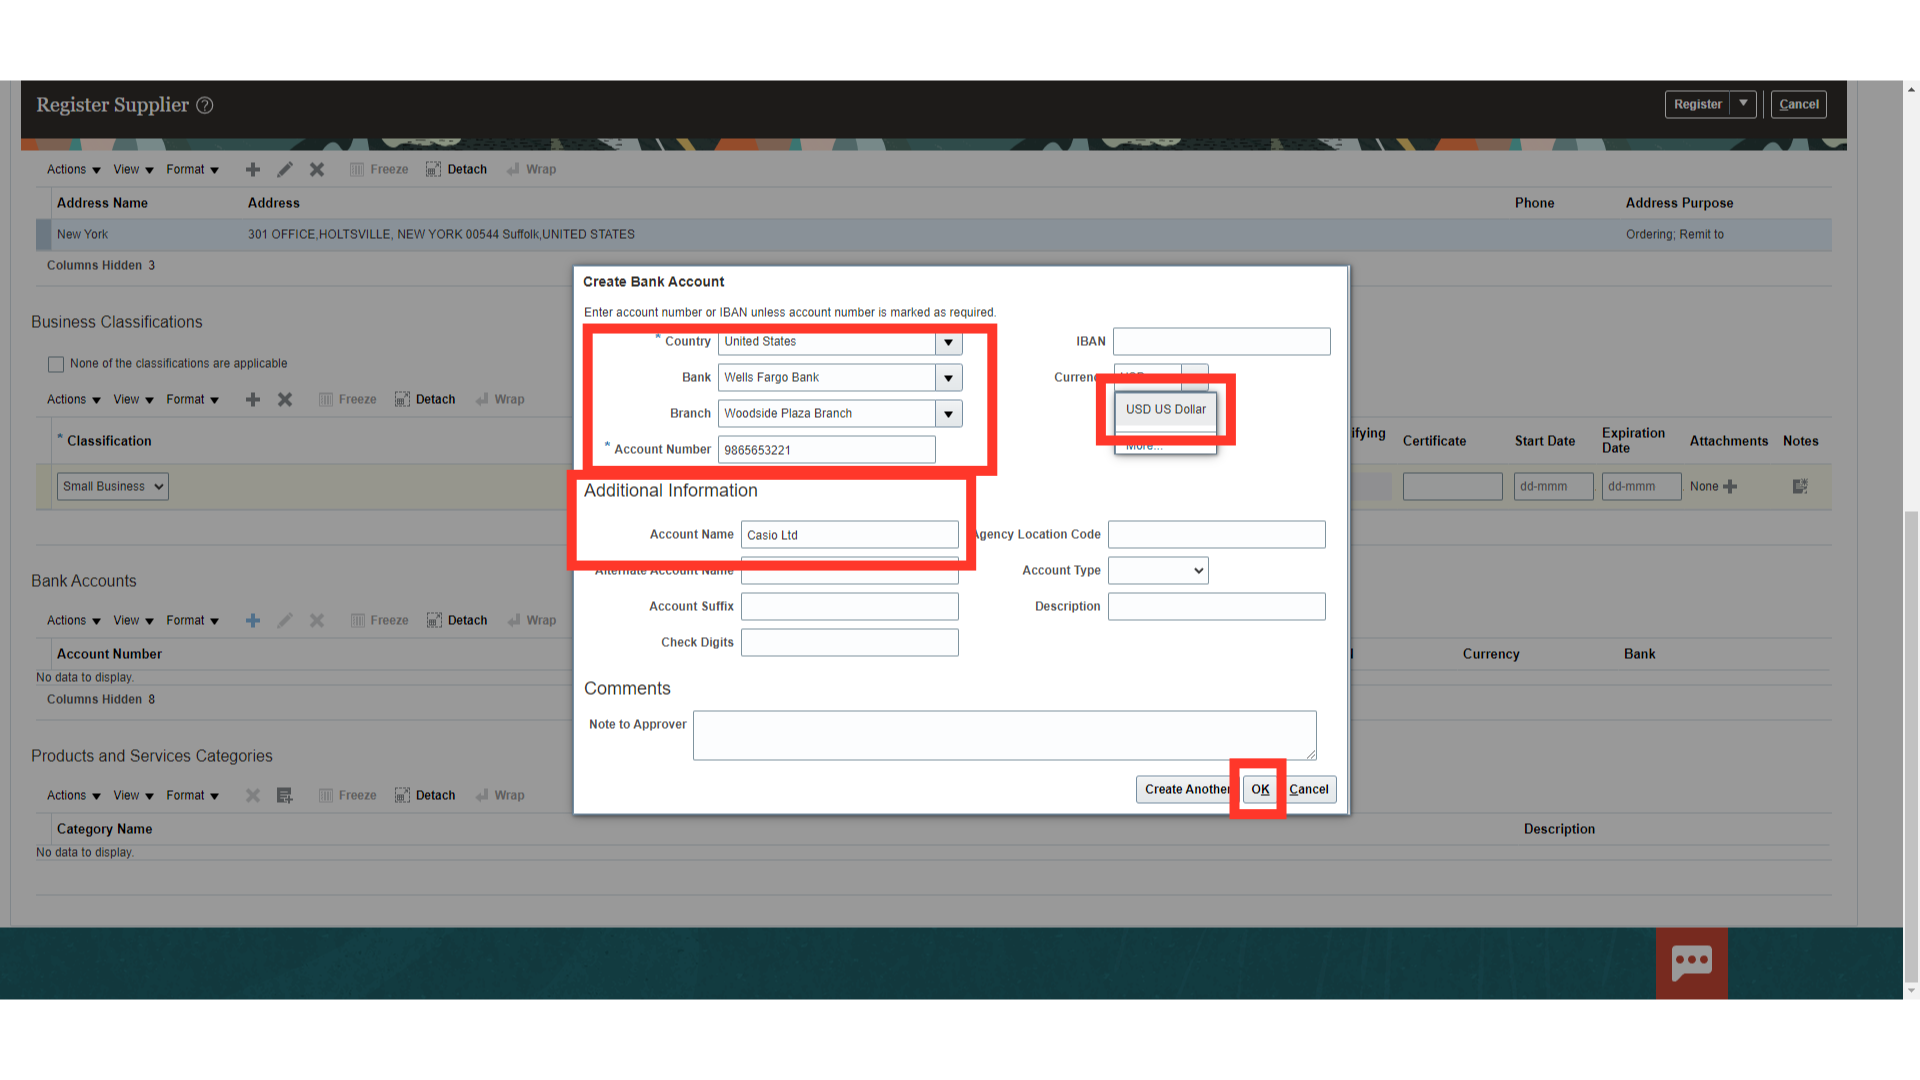
A Bank Account pop-up will appear. Enter the following details
Country: The country in which the bank account of the supplier exists.
Bank: Select the value from the list as applicable
Branch: Select the value from the list as applicable (Please contact your IT administrator if the Bank or Branch value that you require is not available in the list of values).
Account Number: The bank account number of the supplier in which the amount is to be remitted.
Currency: The currency in which the amount would be required to be remitted.
Account name: Account name of the bank account of the supplier.
Once the required details are entered click on Ok to confirm.
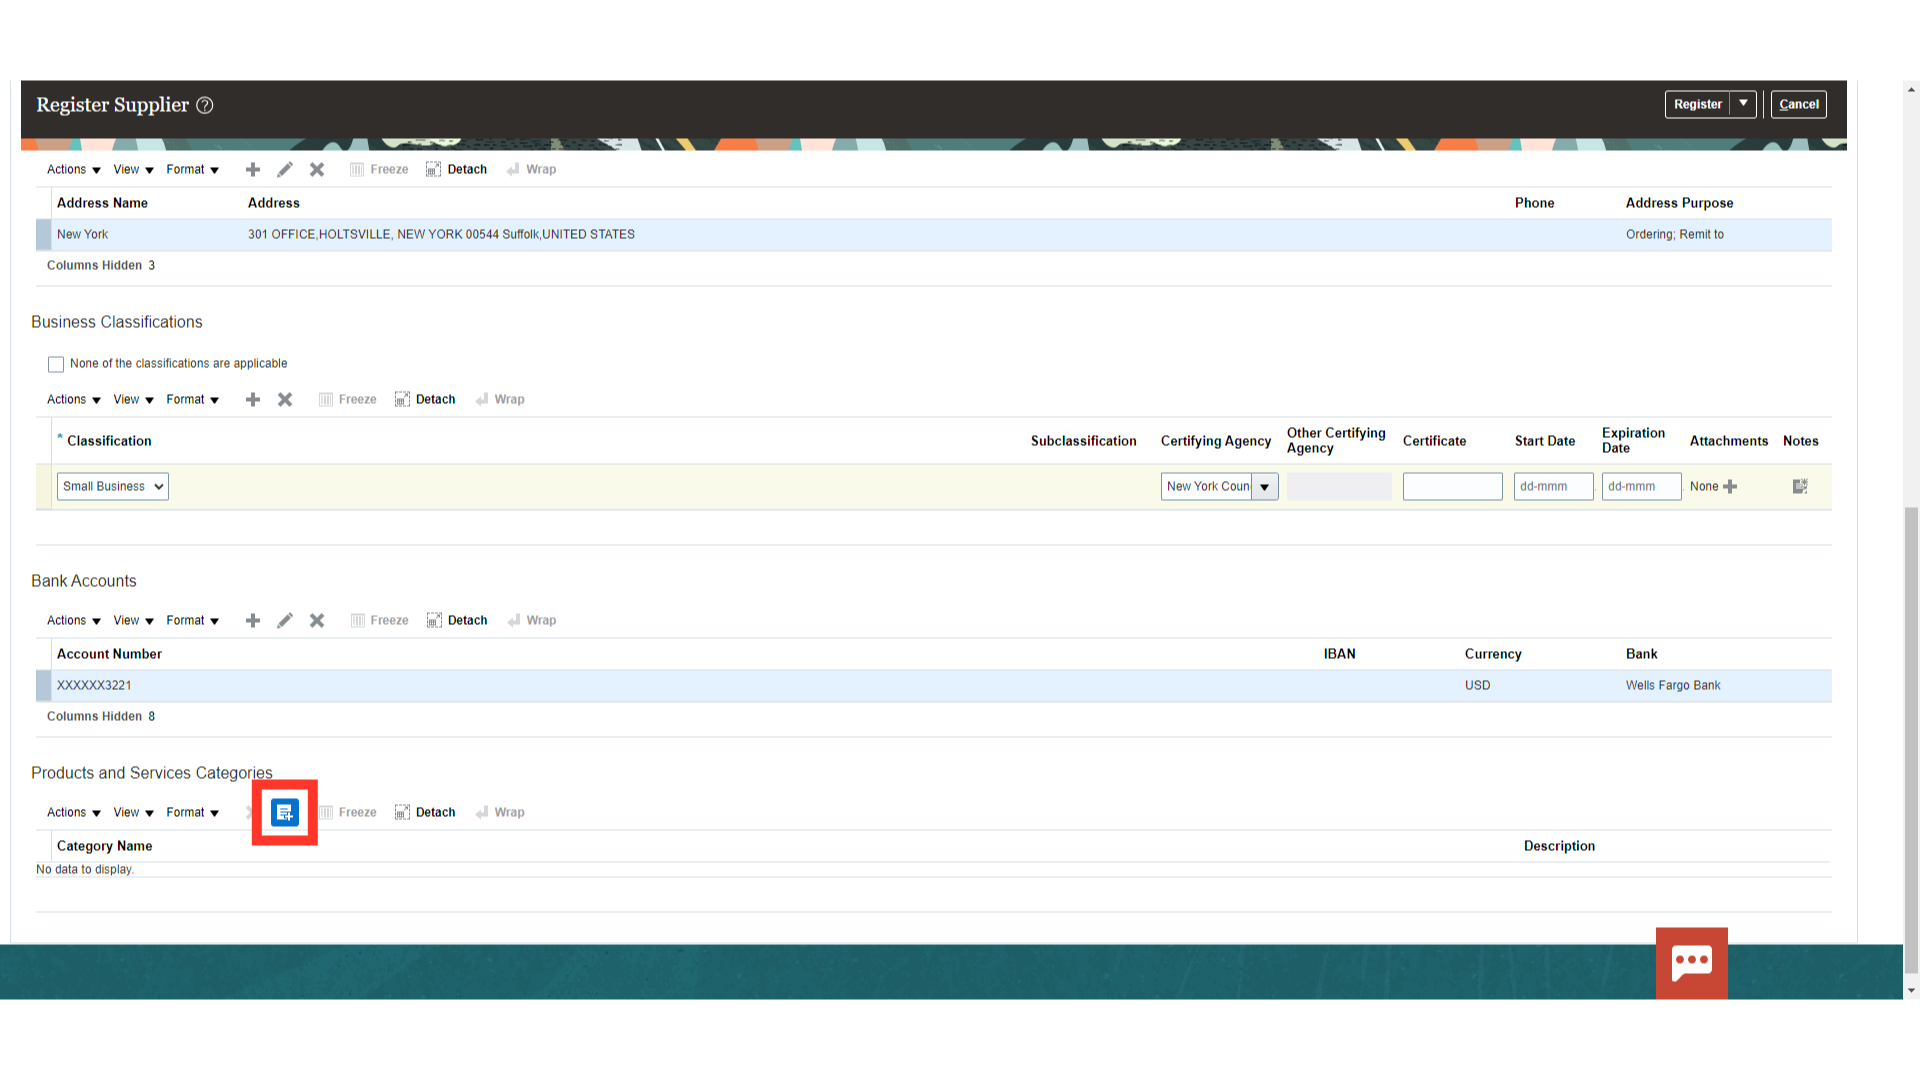
If your organization is maintaining the Products and Services Category Hierarchy, then you can easily identify the products and services categories that suppliers and prospective suppliers can provide. To select the Product and Services category click on the ‘Select and Add’ icon as highlighted.
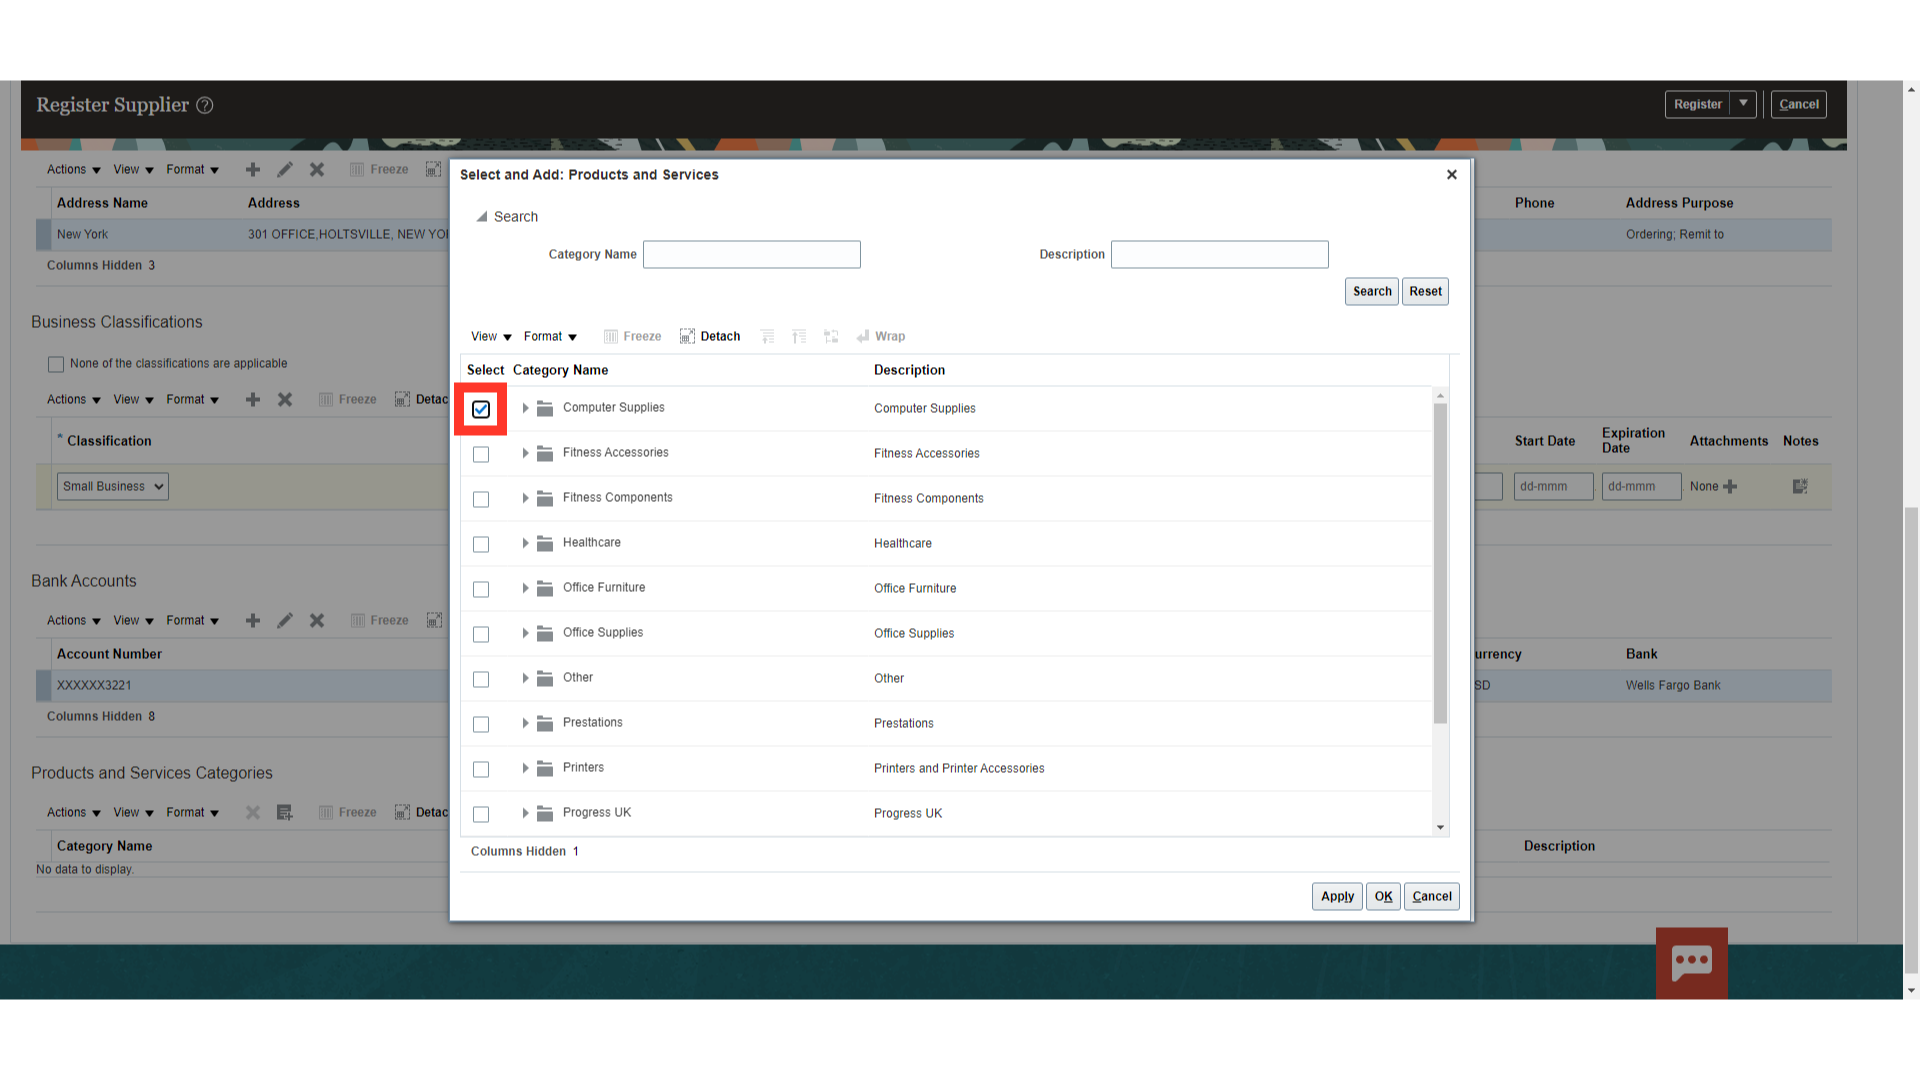
Select the category of the product that the supplier will provide by checking the check box against the applicable products and then click on ‘OK’.
Once the details are entered for all the relevant sections, click on the “Register” button to proceed.
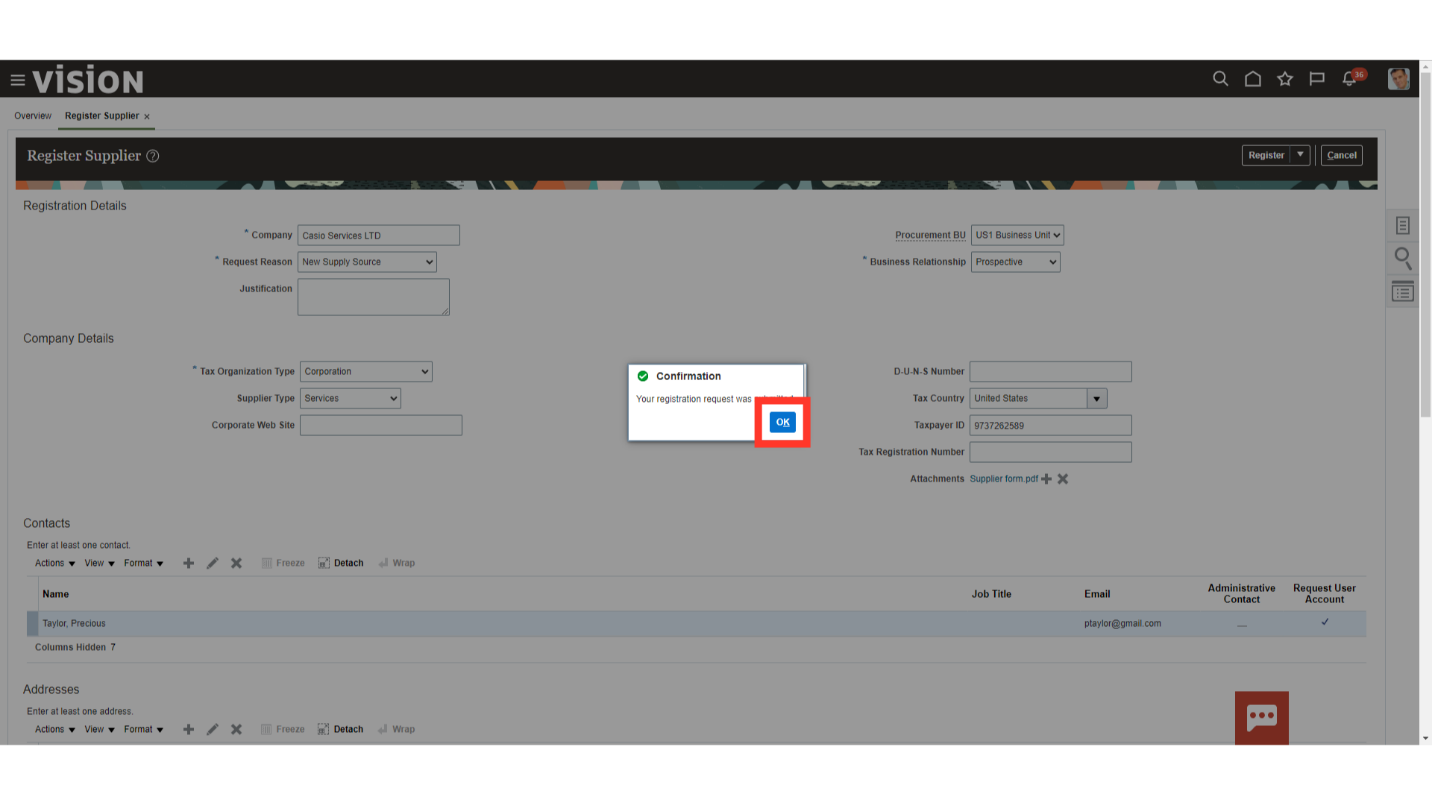
Select “OK” to confirm. This will submit the request for supplier registration.
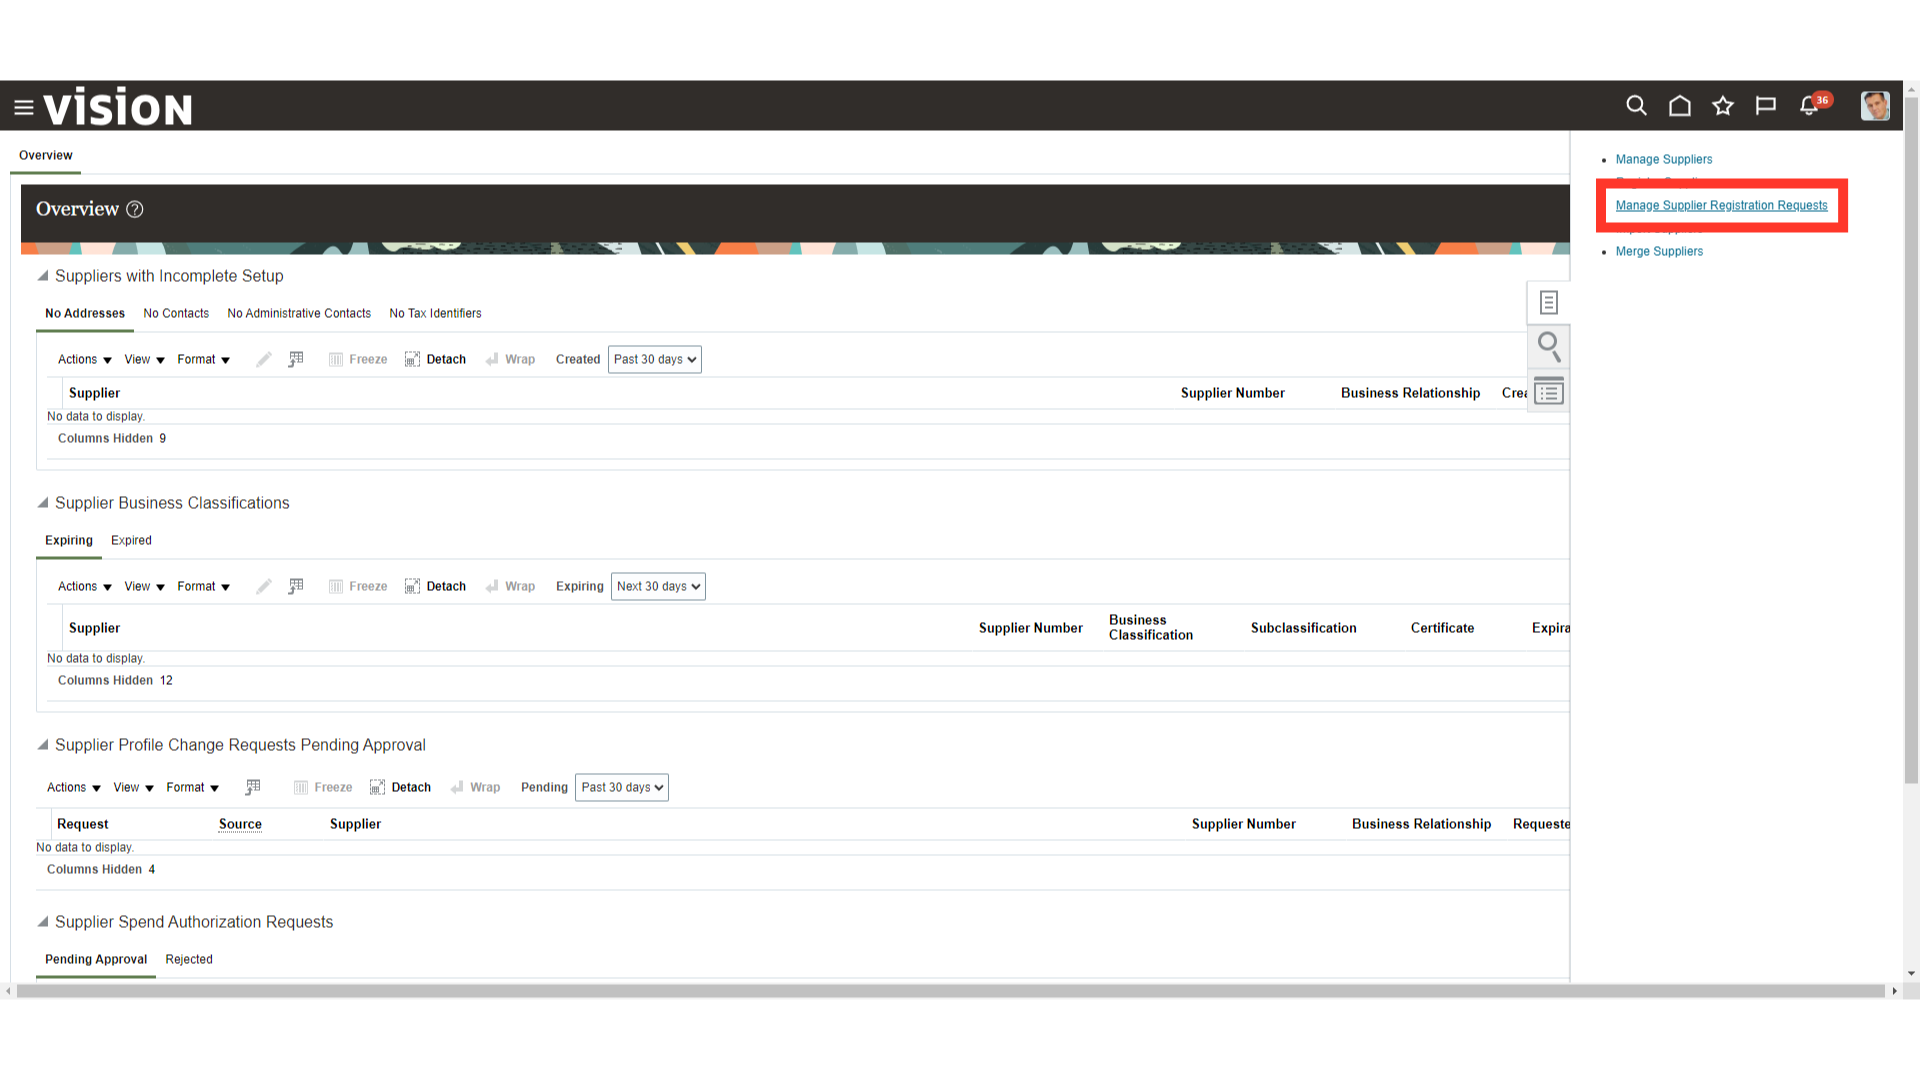
To review the open registration requests which are submitted, on the Supplier Dashboard click on tasks and then select “Manage Supplier Registration Requests” option.
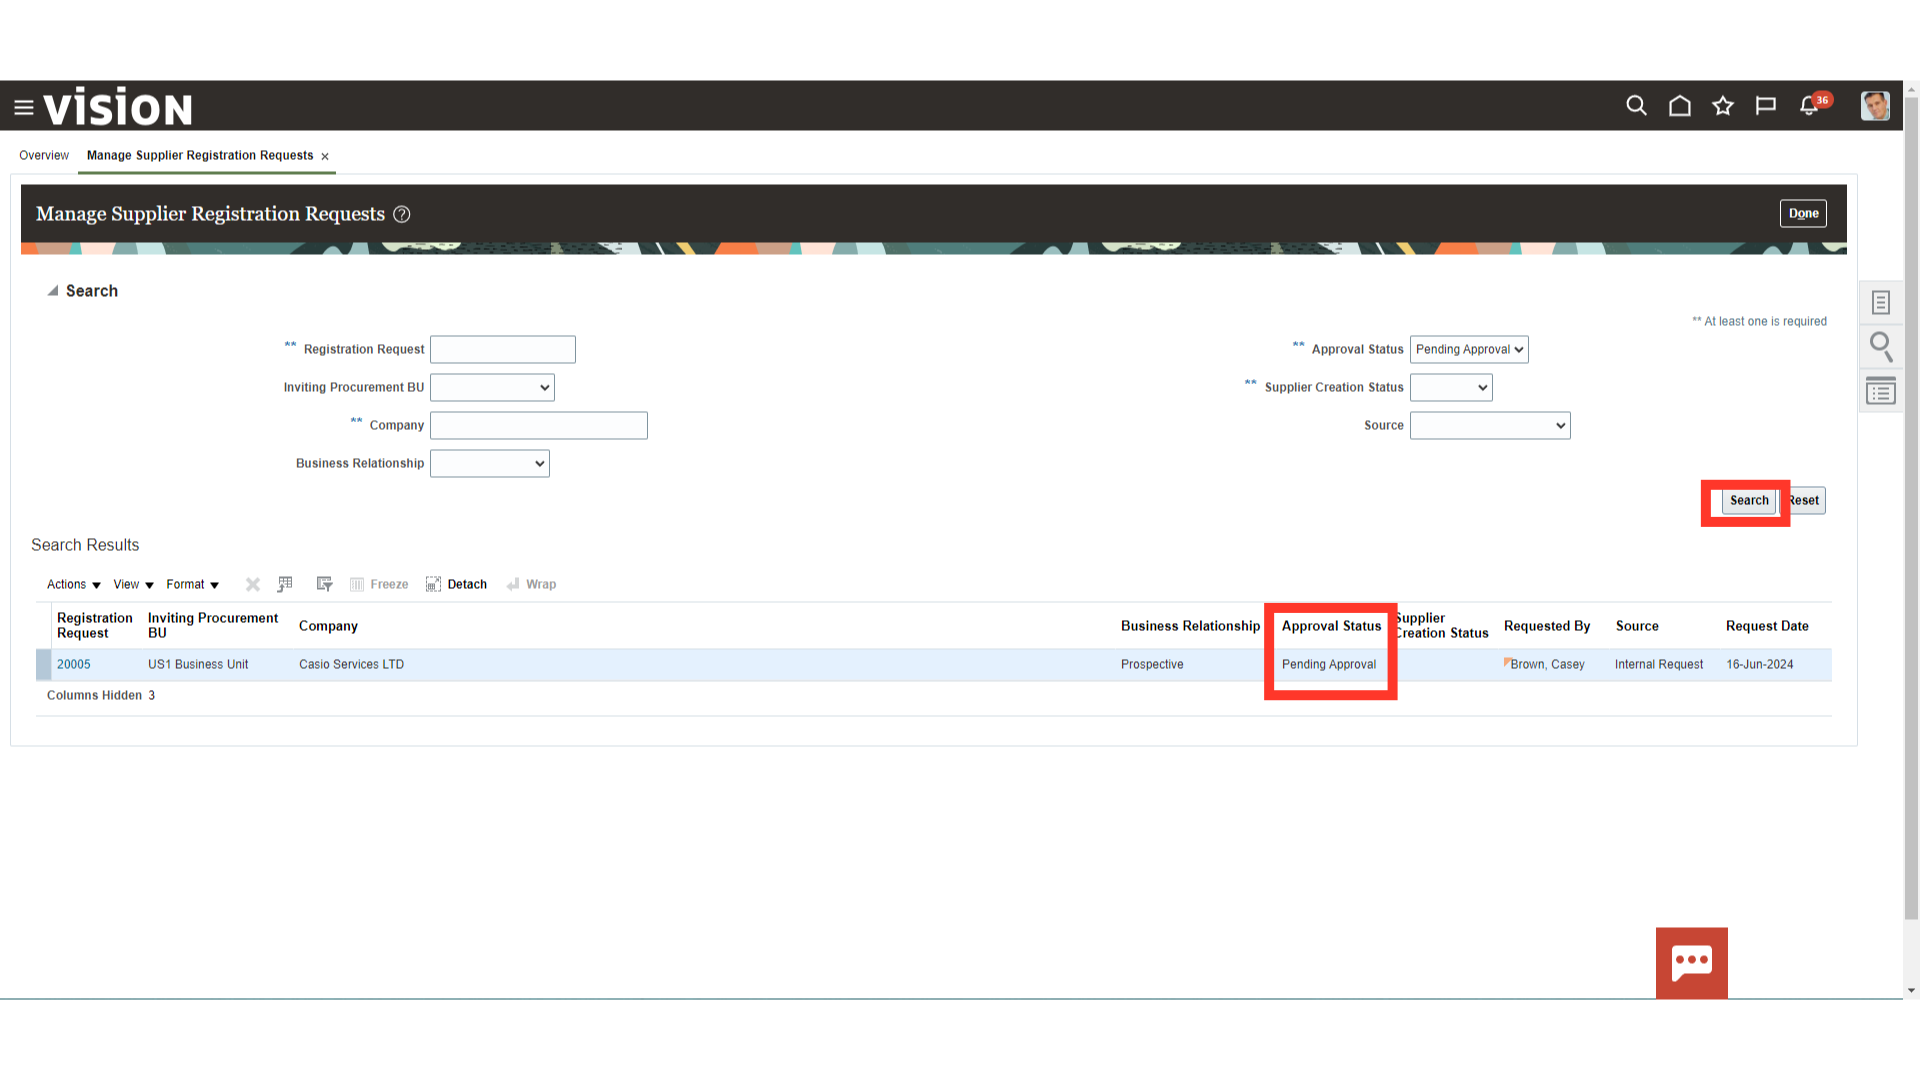
You can search for a specific Registration request from the parameter available and review the Approval status.
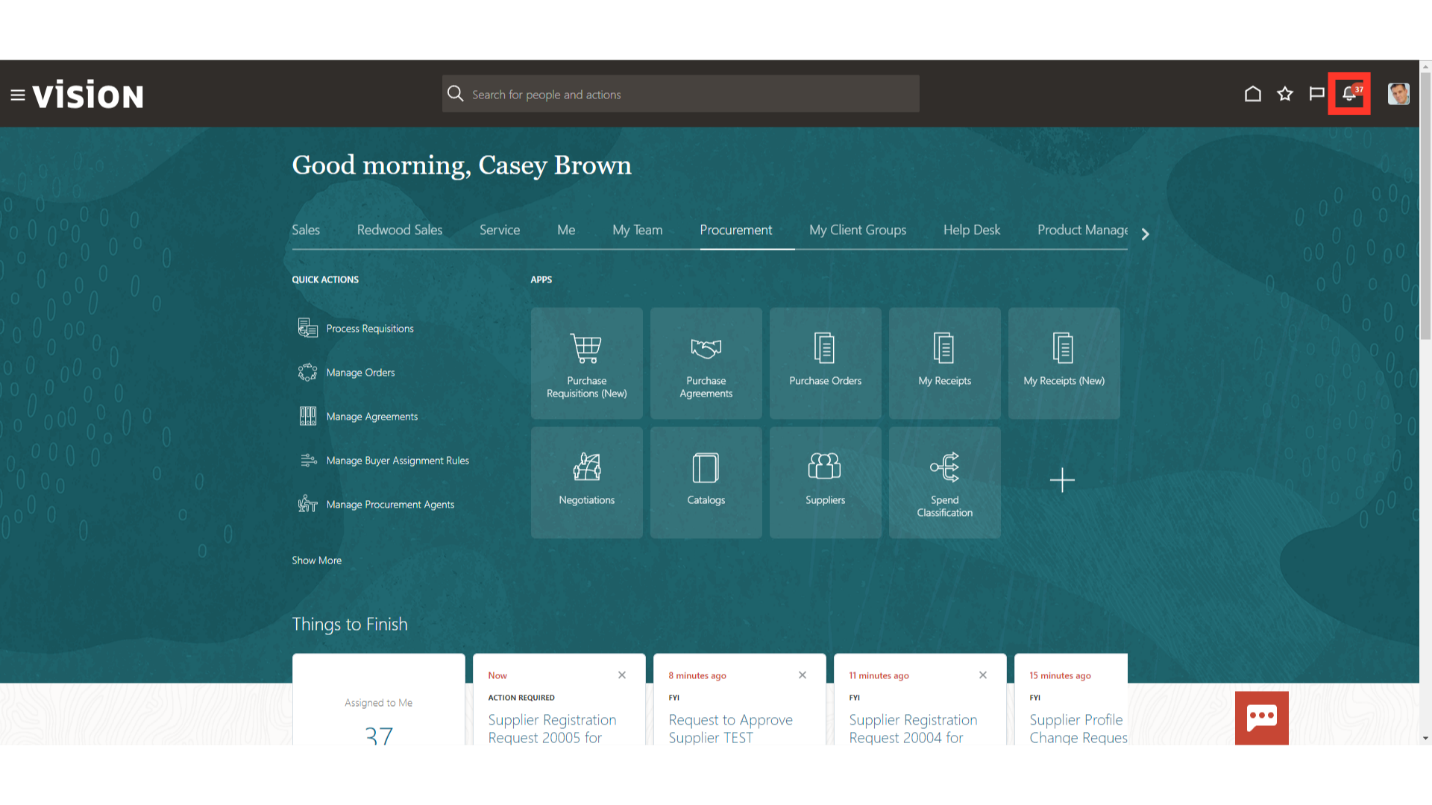
The Approver of the Supplier Registration Request needs to follow the following steps. If you’re an approver, click on the Bell Icon on the top right corner.
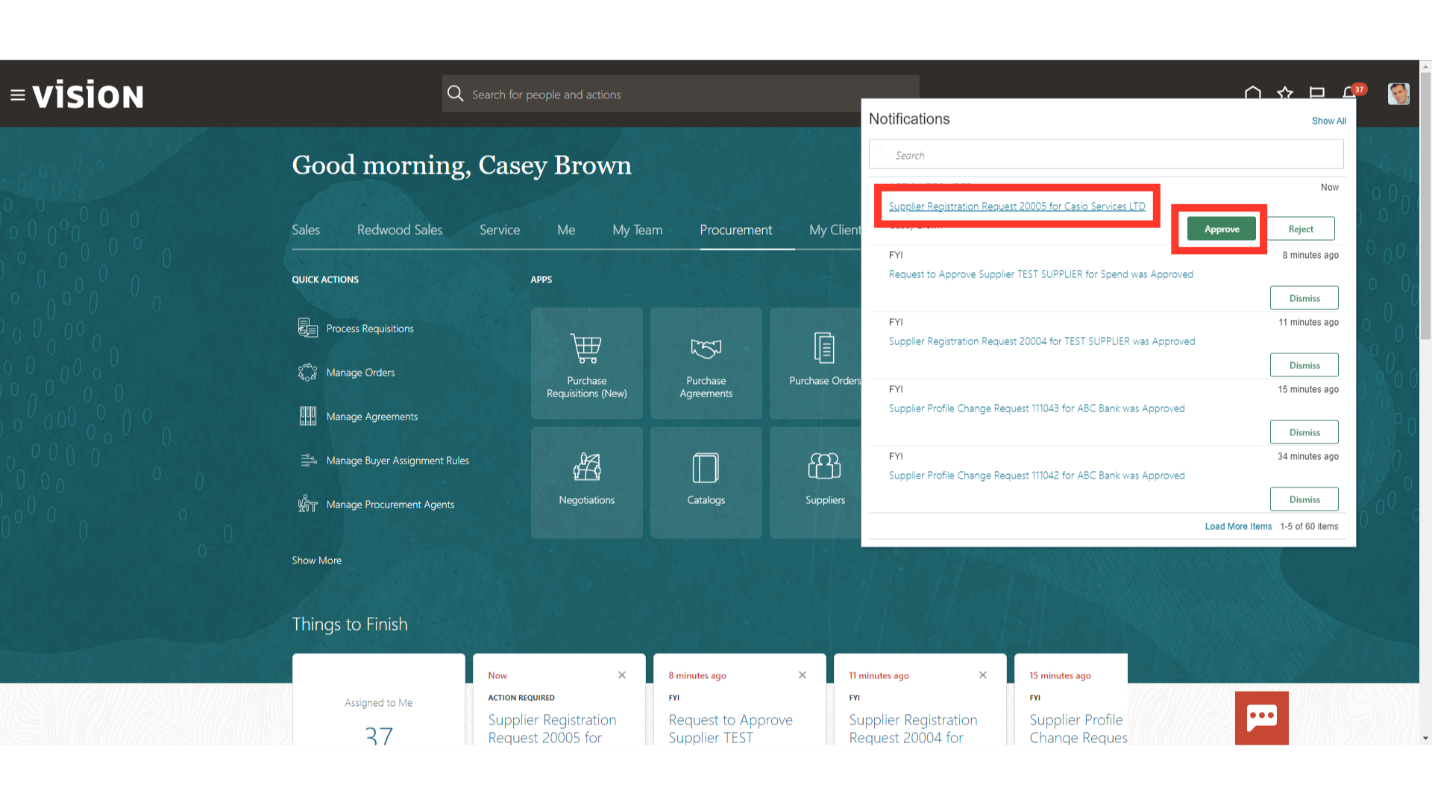
Choose the relevant Supplier Registration Request. You can directly approve the request from the notification list by clicking on the ‘Approve’ button. If you need to check the details of the request, click on the hyperlink.
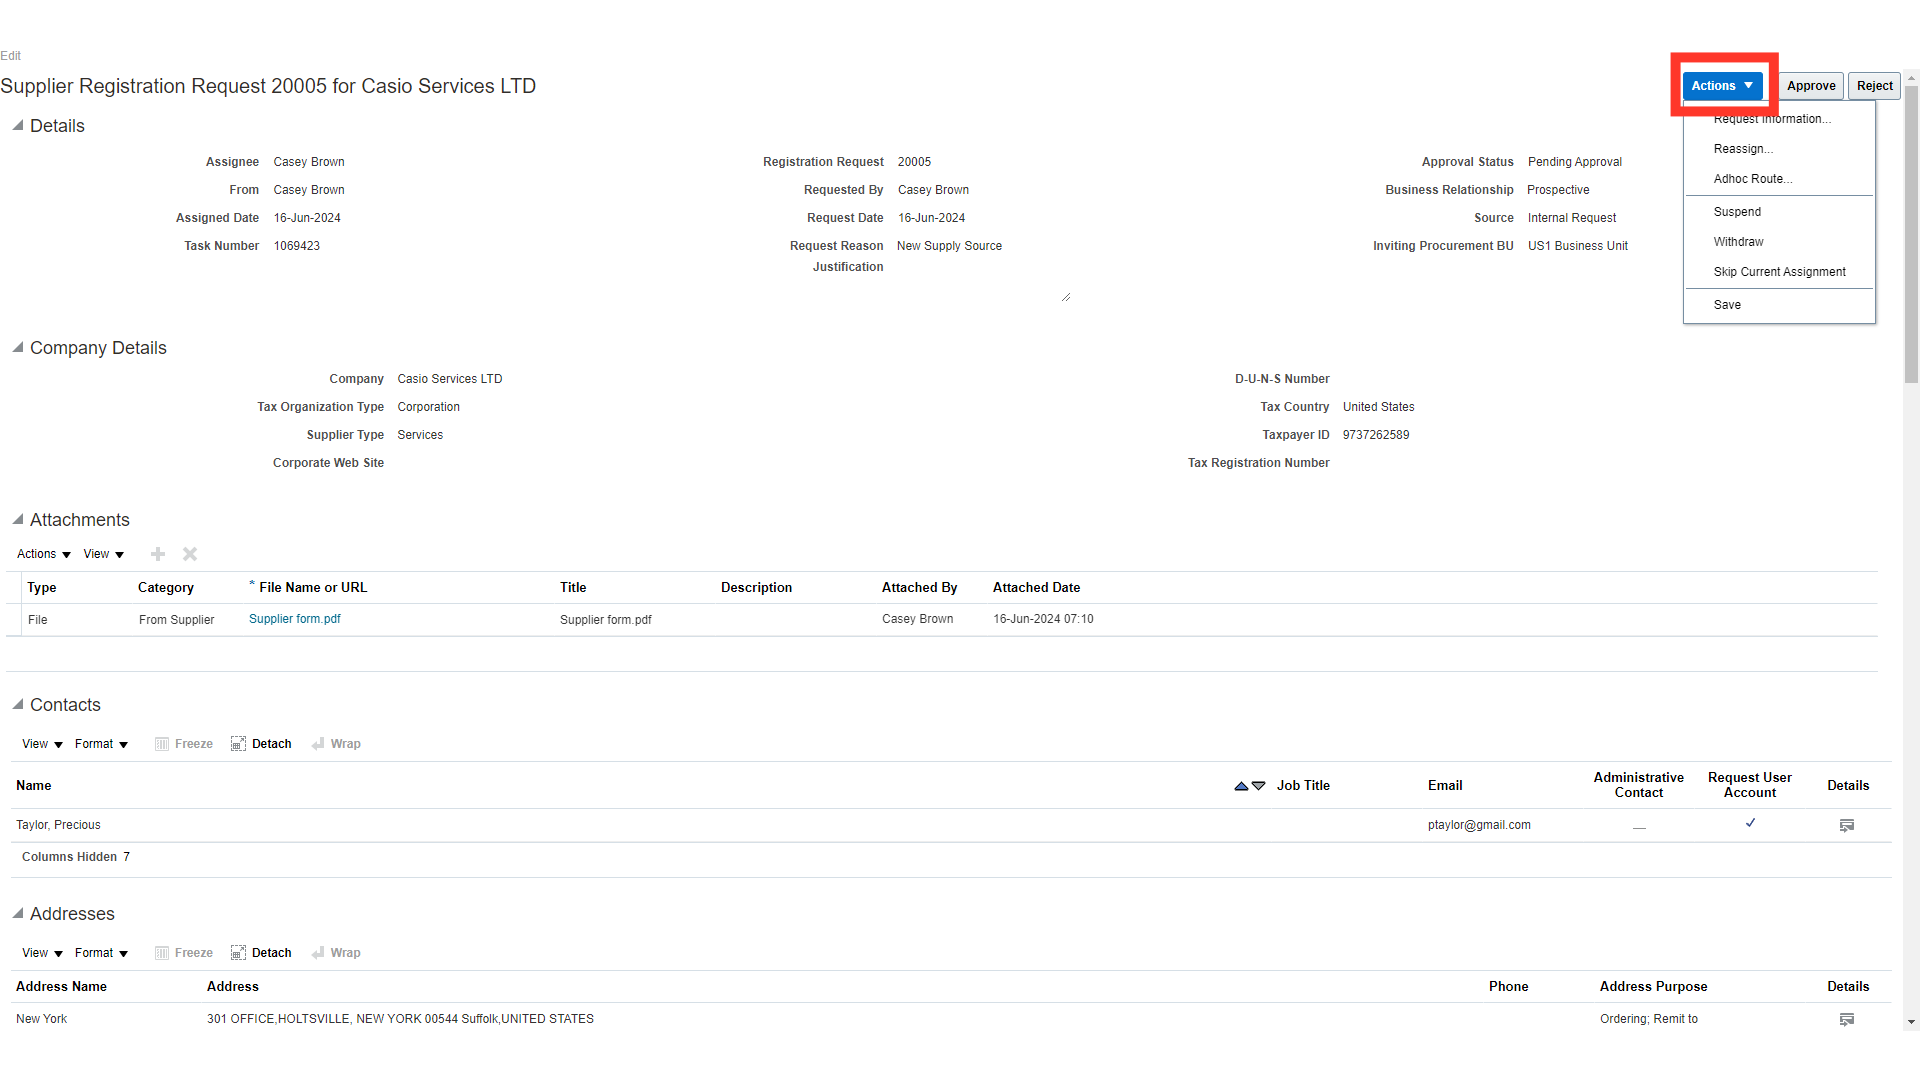
Review all the details. Then click on the ‘Actions’ button and take the action, as necessary. Select the Request Information option if further details/clarifications are required from the submitter. Select the Reassign option to reassign the approval request to another approver. Select Suspend which would suspend the notification that is currently pending approvals. It will no longer show up as an item for the assignee of the notification and approvals will be suspended. Once a task has been suspended, the menu will start showing a resume action. The resume will put the notification back into the assigned status to be updated. Select Withdraw to withdraw the request from the approval process. Select Skip current assignment which will proceed the request to the next approver in line as per the defined workflow.
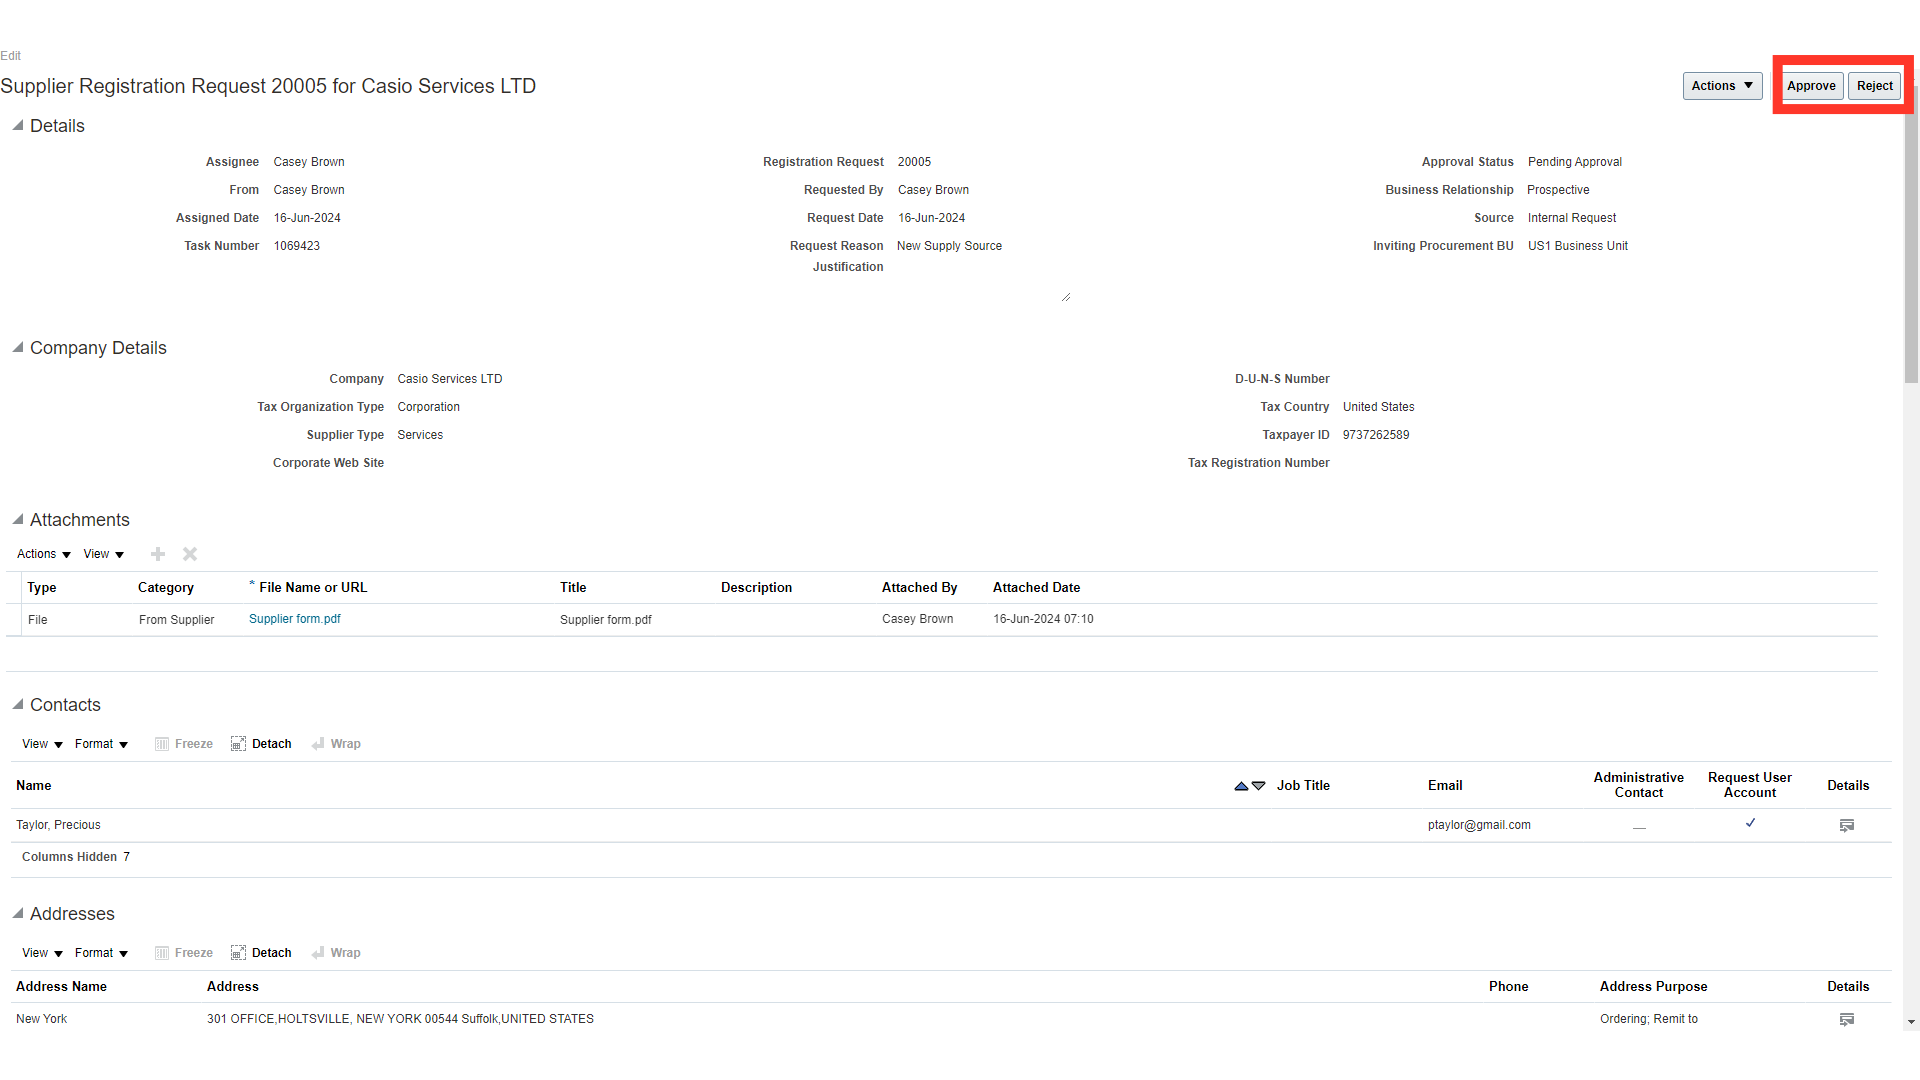
If no additional action is required, you can either Approve or Reject the request from the respective buttons available.
You can check the approval status of the supplier registration request from the Manage Supplier Registration Requests page.

From entering supplier details to approving registration requests, this guide equips you with the necessary steps to efficiently manage supplier information within the application.